Documentation Index

Fetch the complete documentation index at: https://docs.neoagent.io/llms.txt

Use this file to discover all available pages before exploring further.

Once you’ve generated your API credentials in ConnectWise Asio, you can configure the connection to Neo Agent through the integrations dashboard.
You’ll need the Client ID, Client Secret, and region information from your ConnectWise Asio portal to complete this setup.

Required Information

Before starting the connection process, gather the following information from your ConnectWise Asio system:
Region
string
required
Your ConnectWise Asio region. This determines which API endpoint Neo Agent will use. Available options: US, EU, or AU.
RMM Client Id
string
required
The Client ID from your generated API access credentials in ConnectWise Asio.
RMM Client Secret
string
required
The Client Secret from your generated API access credentials in ConnectWise Asio.

Configuring the Integration

1

Access the Neo Agent Dashboard

Navigate to the Neo Agent Dashboard and log in with your credentials.
2

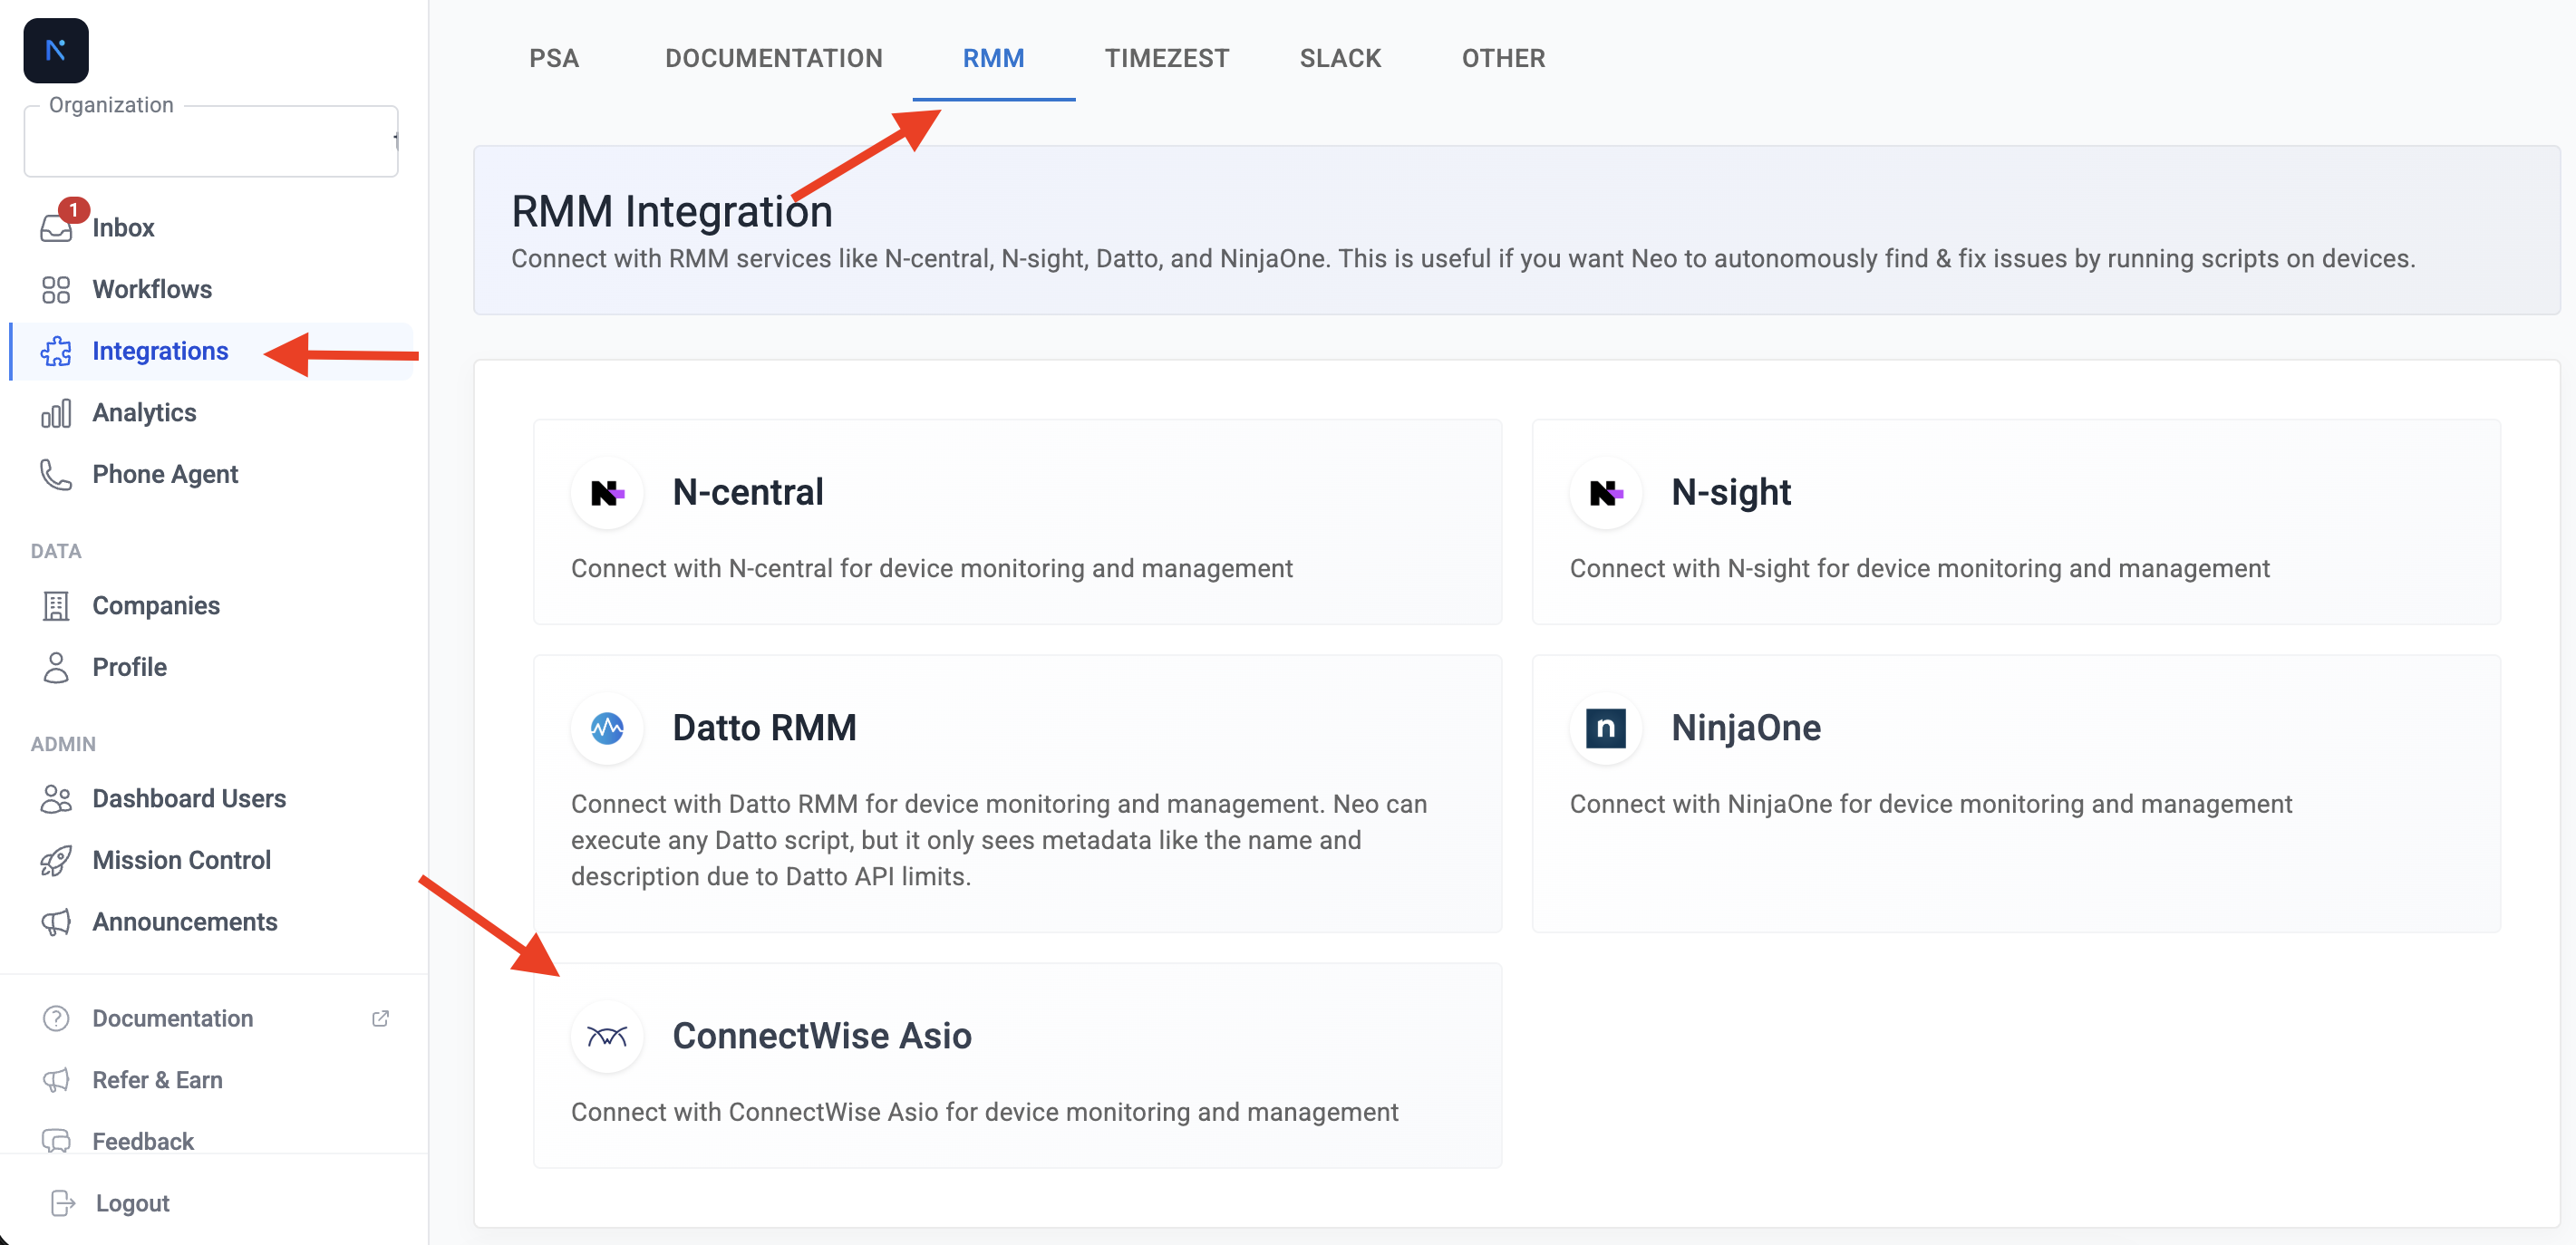
Navigate to RMM Integrations

From the dashboard:
  1. Click Integrations in the left sidebar
  2. Select the RMM tab at the top of the page
  3. Find and select ConnectWise Asio from the list of available RMM integrations
Neo Agent dashboard showing Integrations menu with RMM tab selected and ConnectWise Asio option visible
3

Enter Your Credentials

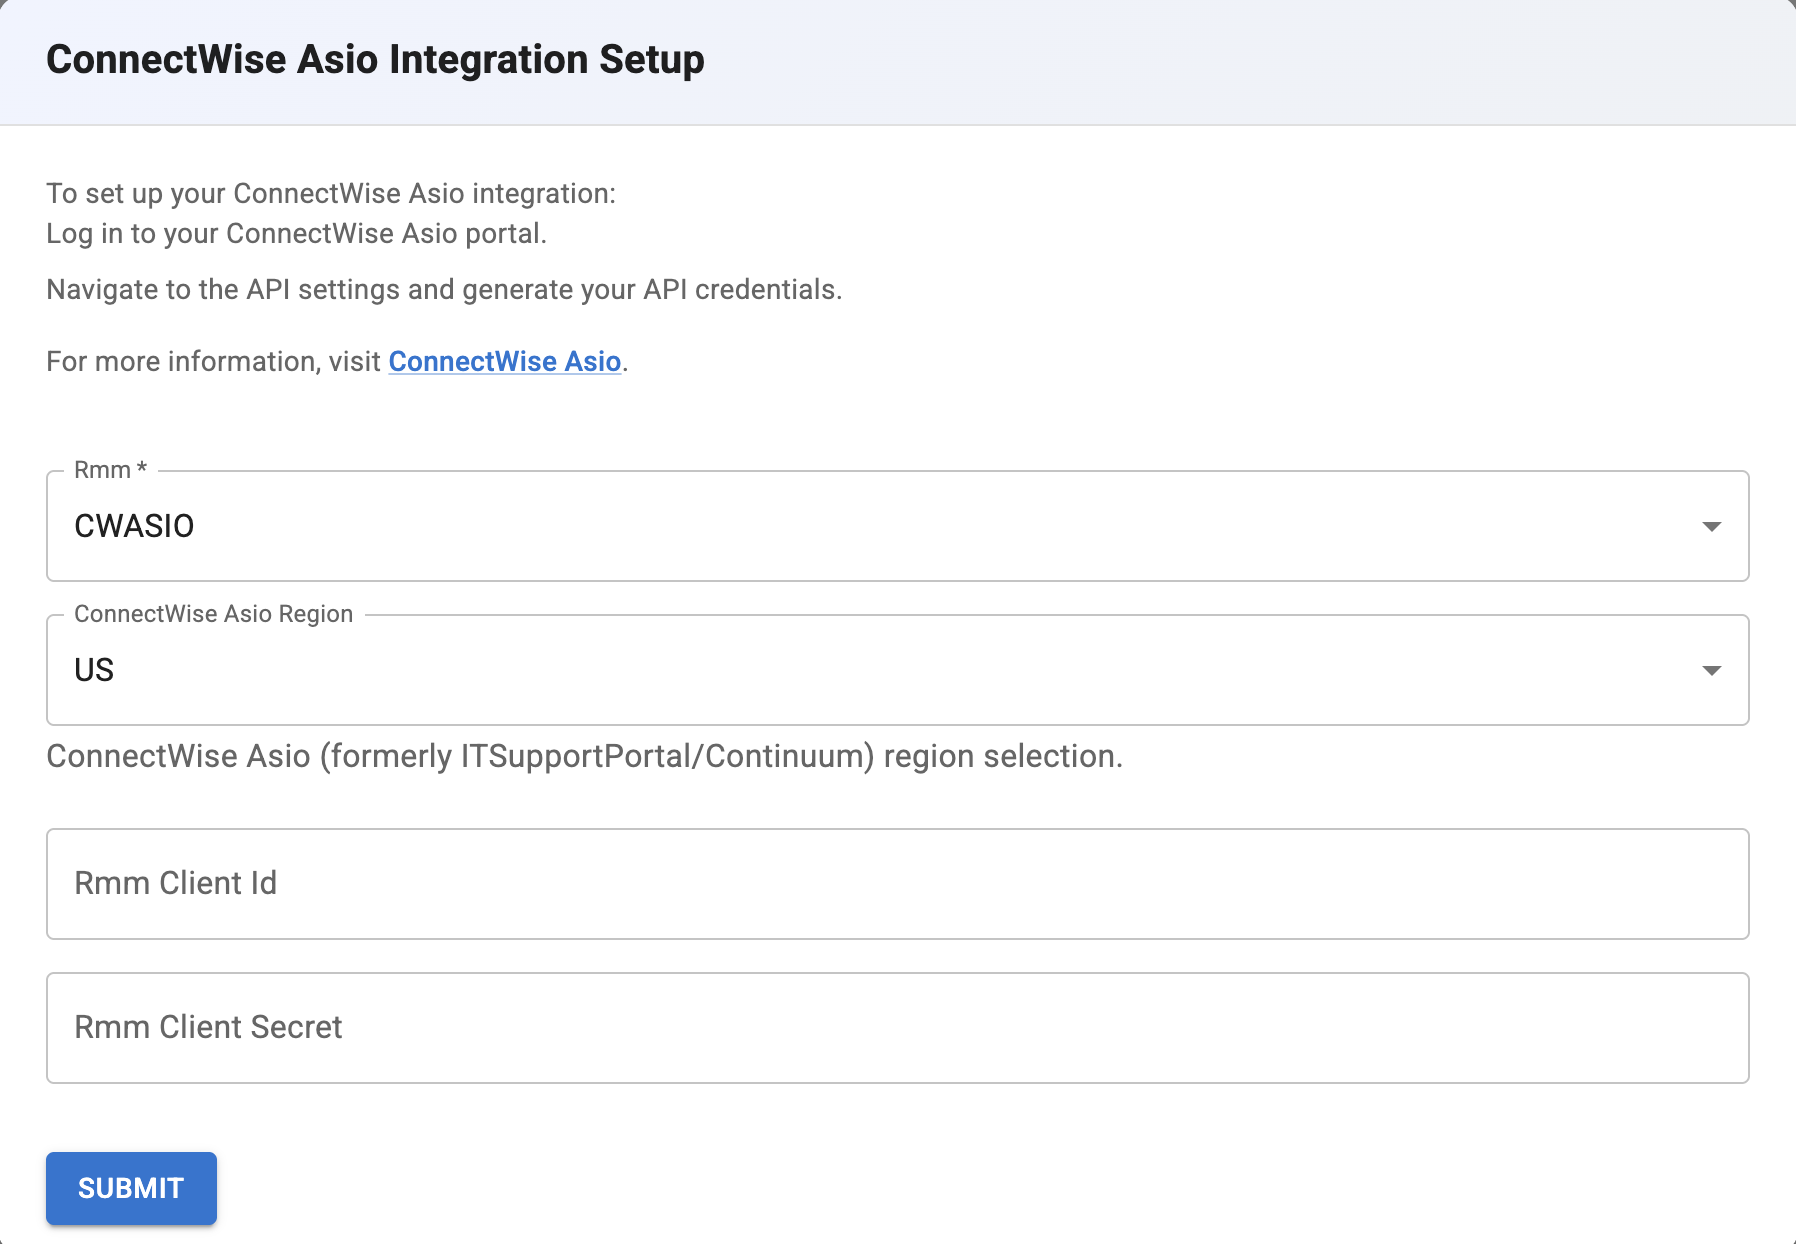
Complete the ConnectWise Asio Integration Setup form:
  1. RMM: Ensure CWASIO is selected
  2. ConnectWise Asio Region: Select your region (US, EU, or AU)
  3. RMM Client Id: Enter your Client ID from ConnectWise Asio
  4. RMM Client Secret: Enter your Client Secret from ConnectWise Asio
ConnectWise Asio Integration Setup form showing region dropdown and credential fields
Double-check all credentials for accuracy. Incorrect information will prevent Neo Agent from connecting to your ConnectWise Asio system.
4

Submit Configuration

Click Submit to save your integration configuration. Neo Agent will validate the credentials and establish a connection to your ConnectWise Asio system.
A successful connection confirms that Neo Agent can access your ConnectWise Asio system with the provided credentials and scopes.

Determining Your Region

If you’re unsure which region your ConnectWise Asio instance uses, check the URL you use to access the portal:
Portal URL PatternRegion
*.itsupport247.net (US domain)US
*.eu.itsupport247.netEU
*.au.itsupport247.netAU
ConnectWise Asio (formerly ITSupportPortal/Continuum) uses region-specific API endpoints. Selecting the wrong region will cause authentication failures.

Troubleshooting Connection Issues

If you encounter issues during the connection process, check the following:
  • Verify that the Client ID and Client Secret are correct
  • Ensure you copied the full credentials without any extra spaces
  • Check that the API access hasn’t been revoked in ConnectWise Asio
  • Confirm you’ve selected the correct region
  • Review the scopes assigned to your API access in ConnectWise Asio
  • Ensure all required scopes listed in the API credentials guide are assigned
  • If scopes are missing, generate new API access with the required permissions
  • Double-check your portal URL to confirm the correct region
  • If you’re unsure, try each region option to identify the correct one
  • Contact ConnectWise support if you cannot determine your region
If devices or scripts are not showing up after successful connection:
  • Verify the API access has the Platform - Agent - Read scope
  • Ensure the Platform - Automation - Read scope is included for script access
  • Wait a few minutes for initial synchronization to complete
  • Try refreshing the connection in Neo Agent settings

Configuring Permission Groups

Once the integration is connected, open Agent Settings → Permission Groups to choose what the agent is allowed to do in ConnectWise Asio. Each group can be set independently to Disabled, Read-only, or Read & Write:
GroupReadWrite
Tickets & Ticketing LookupsList and read tickets, notes, statuses, priorities, types, categories, sources, service boards, tagsCreate/update tickets and notes
Companies & SitesList and read companies and sitesCreate/update companies and sites
ContactsList and read contactsCreate/update contacts
Device EndpointsList and read endpoints (v2 company/site hierarchy)
Custom FieldsList definitions and read valuesWrite values on companies/sites/endpoints
PoliciesRead policy groups, categories, effective policy, overrides
PatchingRead OS patch catalog and status
AlertingRead alerts and suspension rules
IncidentsRead Security360 incidents
Backup DashboardRead alarms, DR readiness, backup instances
Network DevicesRead network-device inventory
MappingsRead endpoint/site/integrator mappings
BillingRead unified product usage
AutomationRead script, shell-script, and task catalog
Write-capable groups default to Read-only on existing agents so the expanded v2.5.7 surface is opt-in per tenant — no agent that was previously read-only suddenly starts making changes.

What’s Next?

With your ConnectWise Asio system successfully connected to Neo Agent, you can now:
  • Ticketing workflows: Neo can triage and create tickets, add notes, and update statuses in ConnectWise Asio
  • Company/site/contact maintenance: Keep CW Asio CRM data in sync with the agent’s workflows
  • Device lookup: Access endpoint information associated with tickets or end users
  • Script suggestions: Neo surfaces relevant scripts from your automation catalog
Direct script execution from Neo Agent is not yet exposed by ConnectWise Asio — technicians execute suggested scripts in the CW Asio portal.
Test the integration by asking Neo to find scripts for common issues or by enabling Read & Write on Tickets and letting Neo resolve a low-priority ticket end to end.