Before you start
- A chat agent you’ve tested in the dashboard.
- The client’s Microsoft 365 tenant ID, set on their company record under Companies.
- A Microsoft 365 admin in the client tenant to approve the one-time install — their admin, or you if you have delegated (GDAP) admin into their tenant. The tenant must allow custom Teams apps either way.
Test in your own tenant first
Two ways to try a bot before a client ever sees it, covering different things:- Behavior — does the agent answer the way you want for a given client? Use the dashboard Test as end-client picker — no install, instant.
- The Teams experience — branding, the welcome message, adaptive and approval cards, proactive messages, the install greeting? Install your branded app into your own Microsoft 365 tenant and message it as an employee would.
Deploy
The fastest path is a magic install link: you generate it, the client’s admin clicks it once and approves, and Neo publishes your branded app into their tenant automatically — no zip to upload. (No admin access? See Install the package manually below.)Create and activate the channel
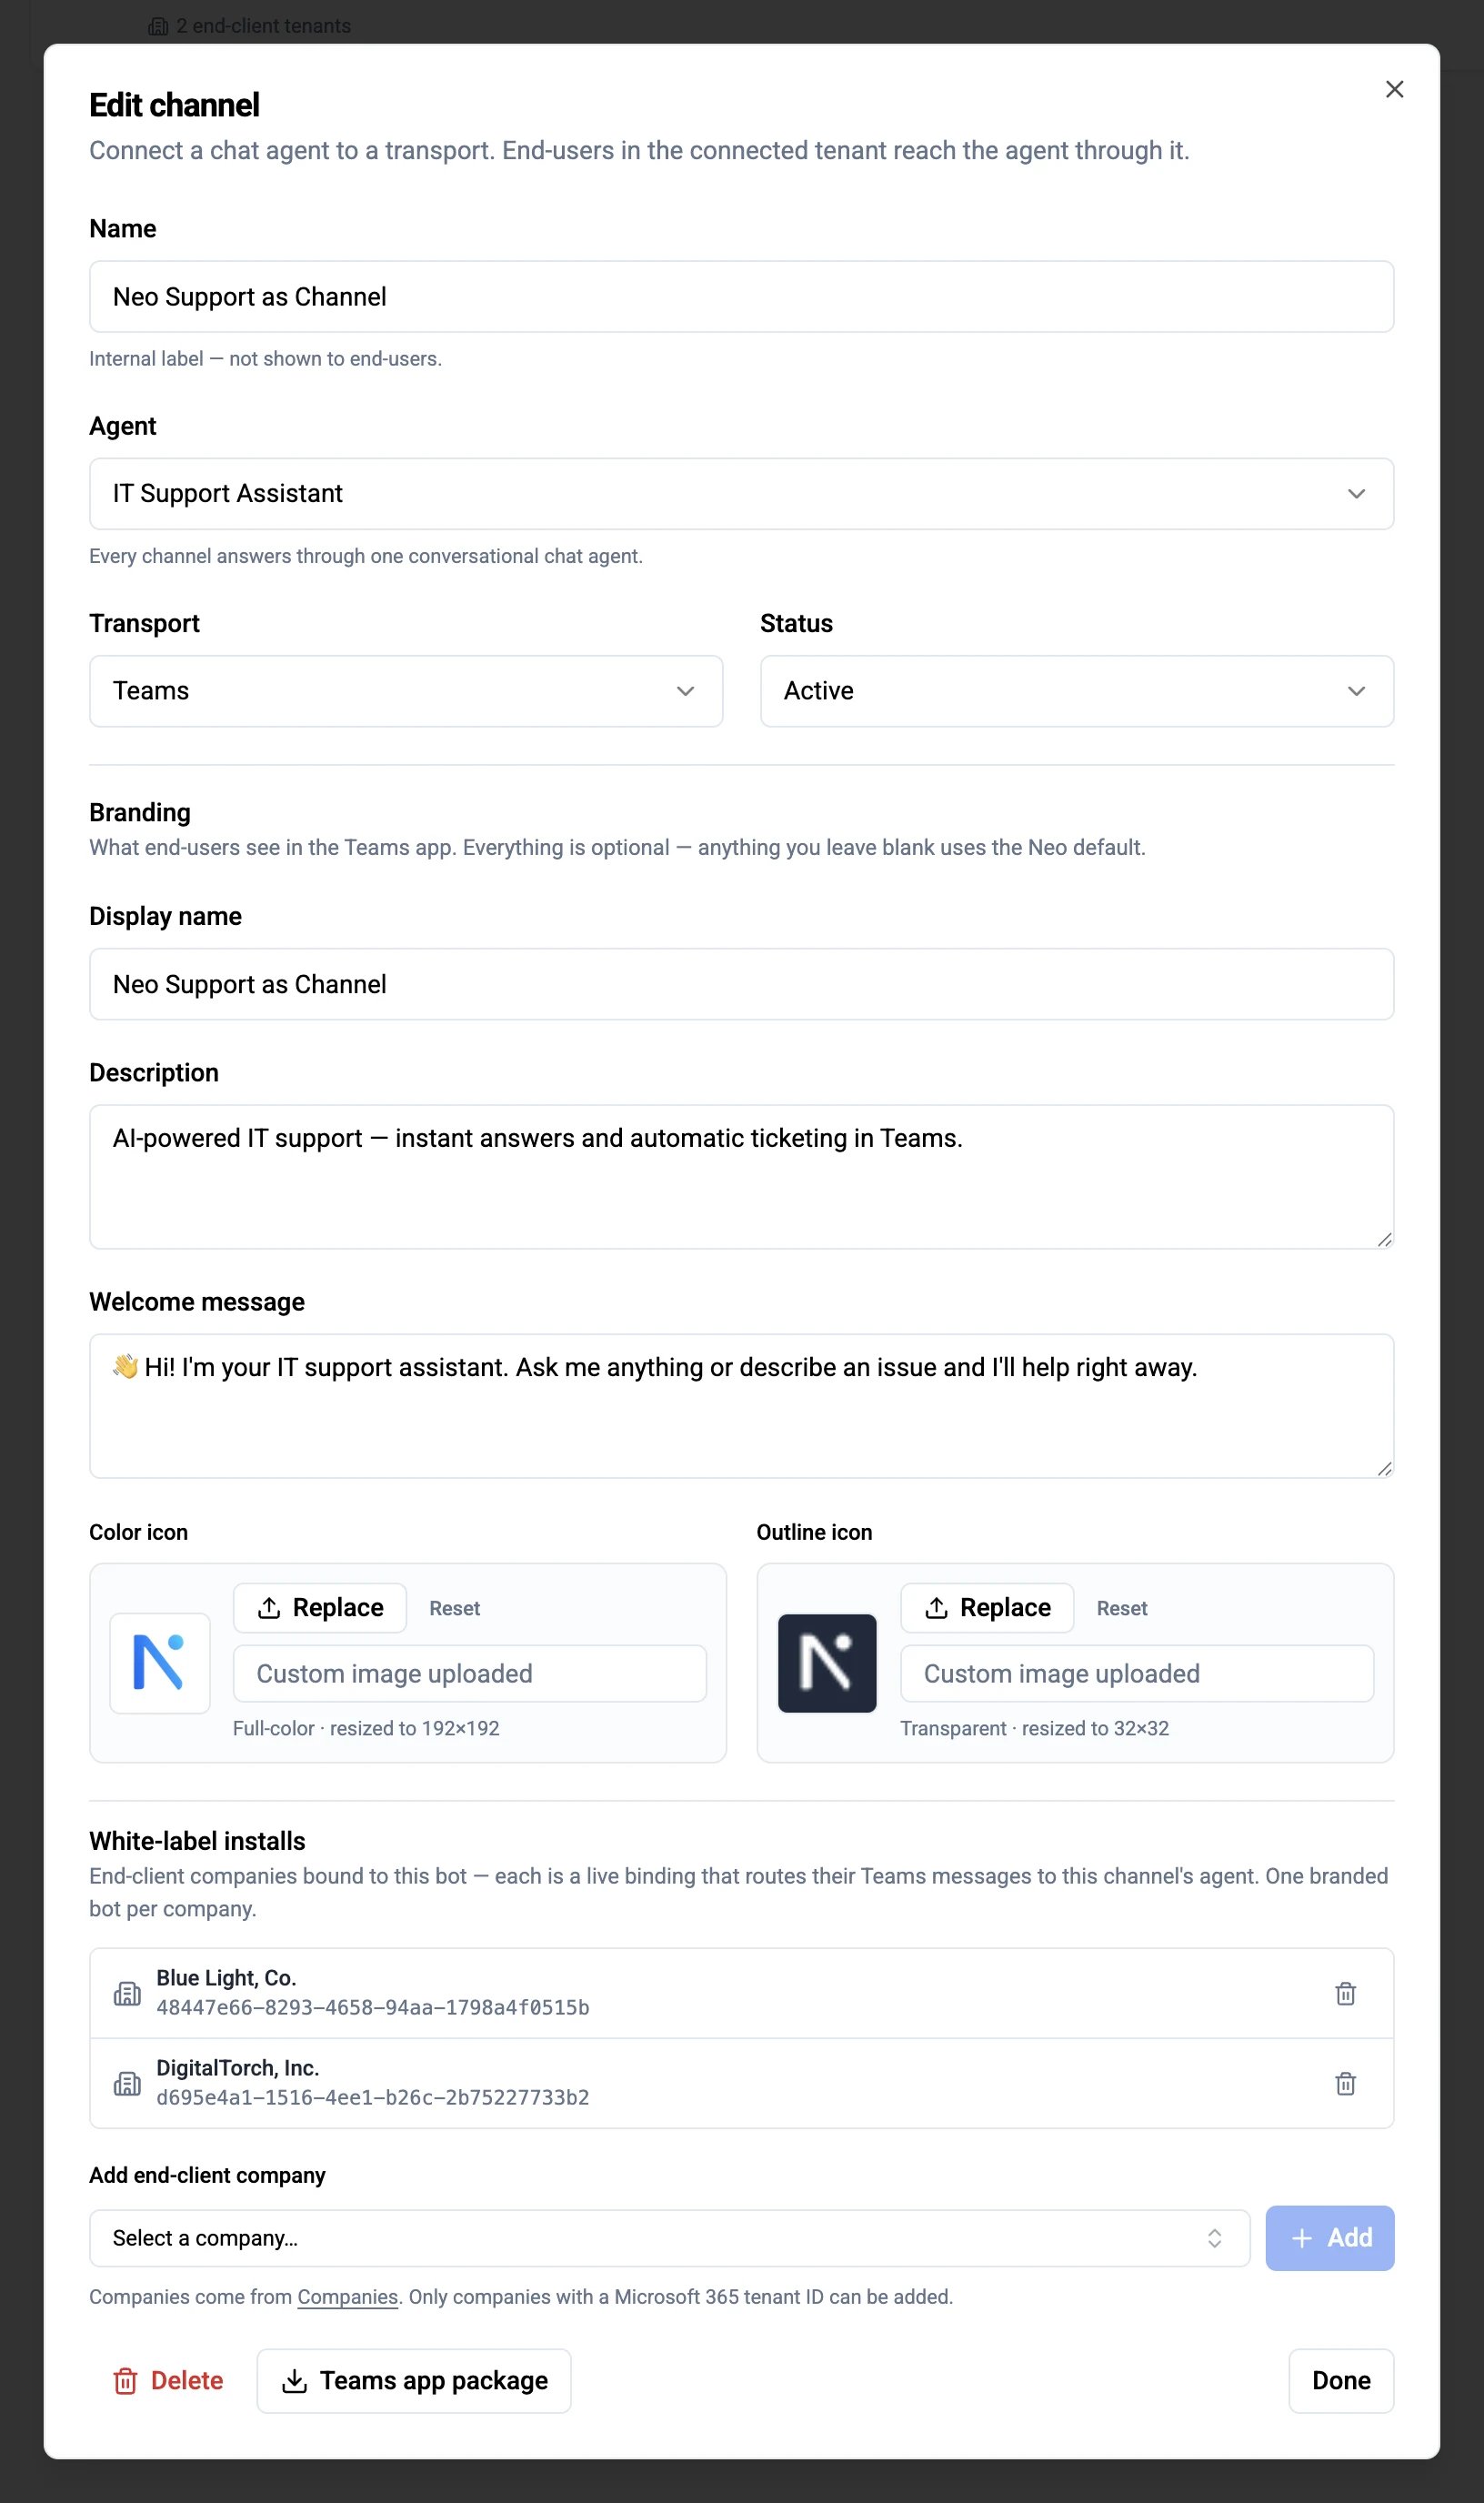
Generate the install link
Send it to the client's Teams administrator
identity and messageTeamMembers. If you have GDAP admin into the tenant, you can open the link and sign in yourself.That sign-in leaves a Neo Installer app in the tenant’s Enterprise applications — leave it in place. If a sign-in errors, have the admin re-open the link rather than deleting it to retry: deleting the app soft-deletes its service principal and blocks the next sign-in with AADSTS650051 (see Troubleshooting).Make it reach their users
Verify
- First contact shows your welcome message (or “Hi! I’m your display name” if you left it blank).
- A 1:1 question gets an answer from your agent.
/reset(or/new) acknowledges and starts a fresh conversation. You can bundle your next question with the command —/reset where's my ticket?starts fresh and answers it right away. Teams sometimes intercepts/-commands with its own menu — if that happens, just type “start a new chat” (no slash) instead.
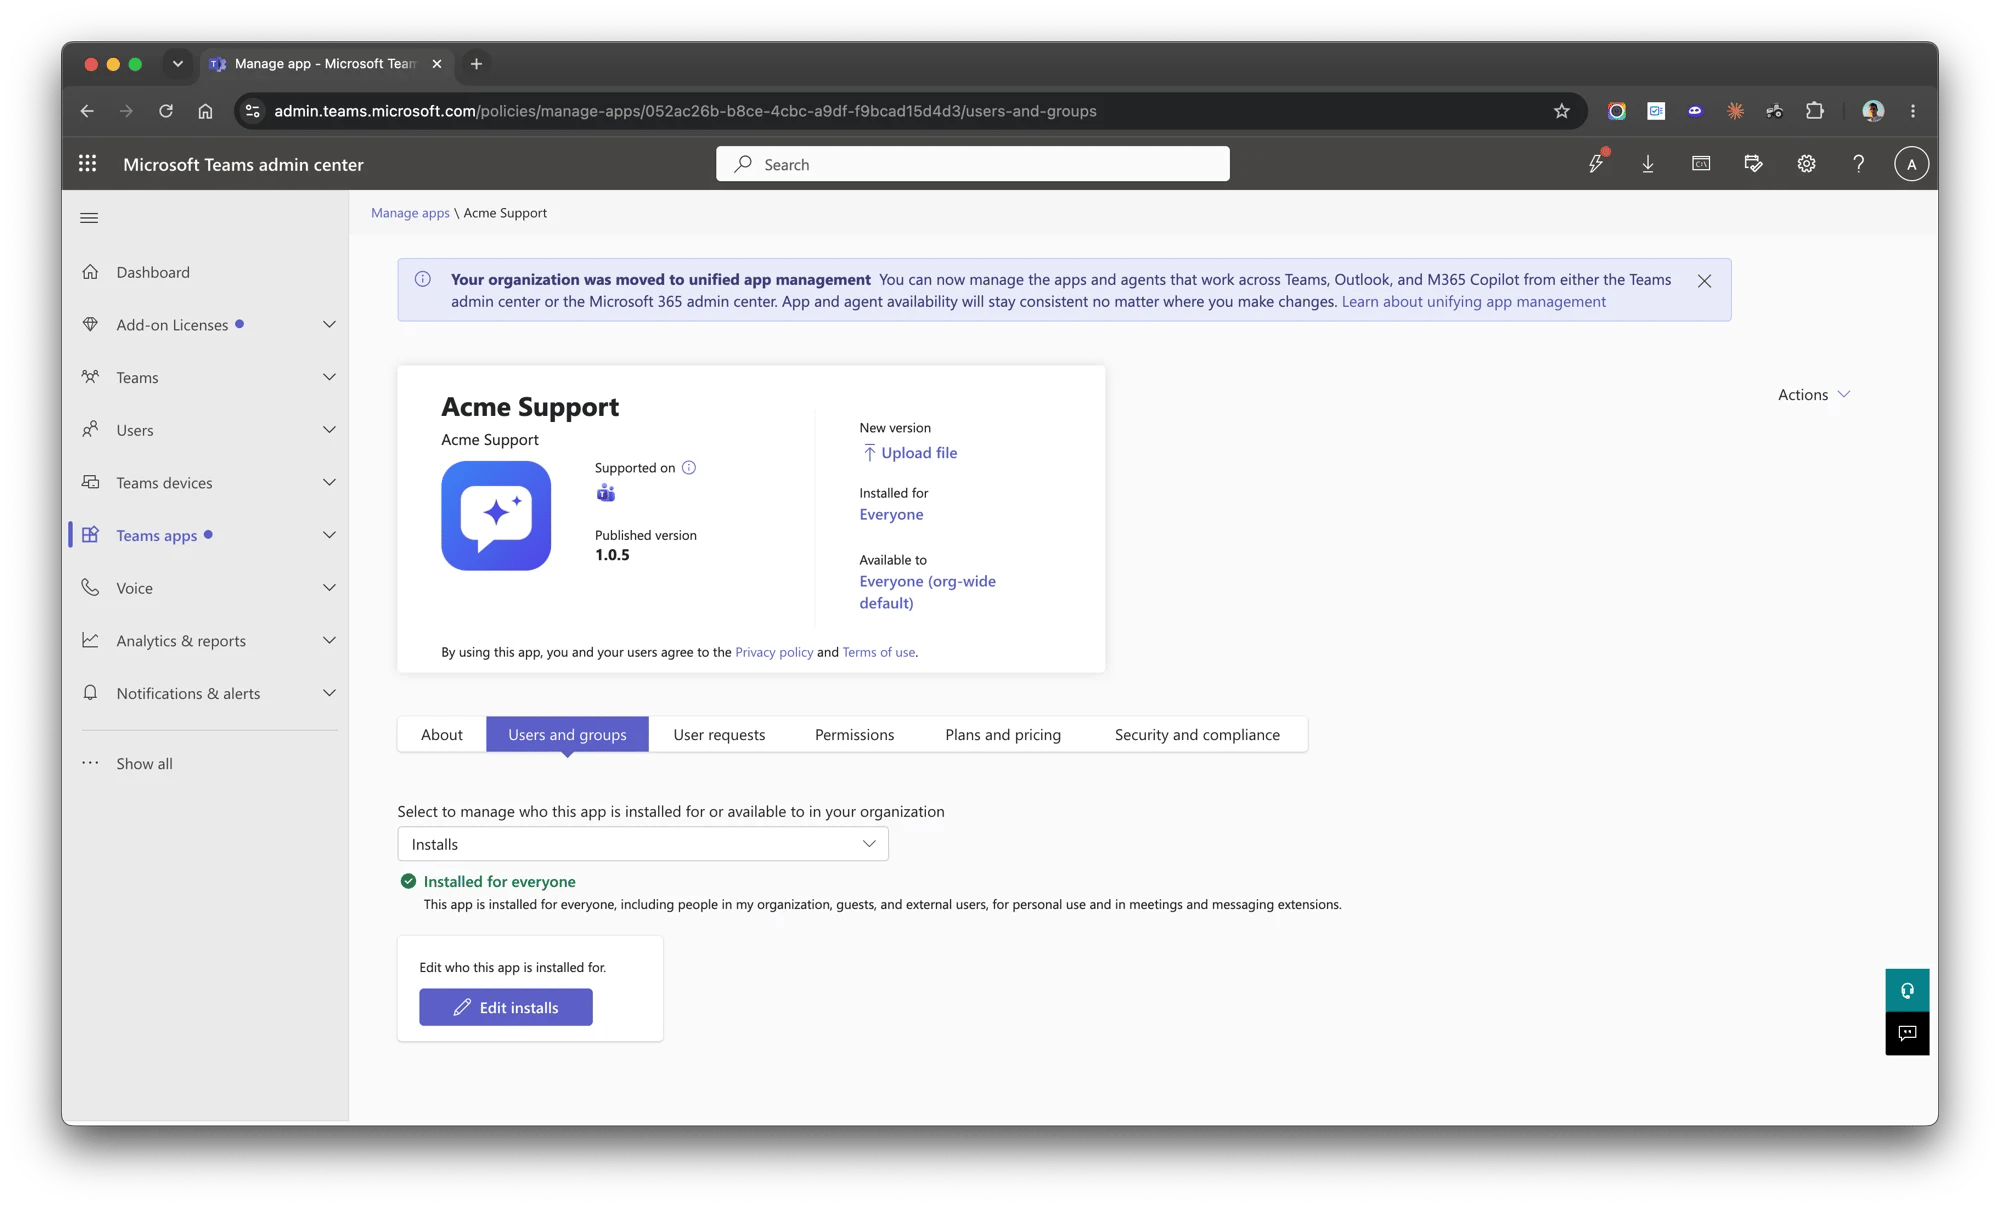
Install the package manually
If the tenant blocks the consent flow, or the app is already installed and you only need to bind routing, use the zip instead of the link:Download the Teams app package
.zip containing the manifest and your icons — upload it exactly as downloaded; re-download it whenever you change branding rather than reusing an old copy.Upload it in the client's Teams admin center
.zip.Register routing on the channel
What end users can access
Every conversation through this bot is scoped to the end user’s company, resolved from the Microsoft 365 tenant the message arrives from. That scope is enforced by Neo, not by the agent’s configuration (the architecture behind it: how end-user bots work):- The bot runs a purpose-built set of end-user tools: it answers from your knowledge base, looks up the user’s own tickets, and (if you enable it) files new tickets and posts replies as the user — all scoped to that one person and their company.
- Tools that operate across your whole client base — MSP-wide ticket search, company listings, configuration/contact search, generic PSA or Microsoft Graph API access, sandbox scripting — never run in end-user conversations, even if they’re enabled on the agent’s toolbox.
- If the inbound tenant isn’t linked to any of your Companies, the bot refuses the conversation and tells the user what their IT provider needs to link — it never answers unscoped.
- One Microsoft 365 tenant can be linked to several companies (branch offices sharing a tenant). Neo scopes each conversation to the company whose PSA contacts hold the speaker’s verified email; if the email isn’t found there (or appears in more than one), Neo picks deterministically — the parent company (Autotask), then the lowest company ID.
- If the speaker’s email matches more than one contact record within the resolved company (some MSPs keep a duplicate contact per site), the bot treats tickets filed under any of those contacts as the user’s own — they can view, reply to, and resolve every one of them. New tickets and replies are still authored under one consistent contact for stable attribution.
- This applies to your own tenant too: a self-install of an end-user channel is company-scoped like any client install. For cross-company technician work, use the Neo AI Agent app and Neo Support — or build a custom internal bot from an Internal channel, which runs with your full MSP toolbox.
Live ticket updates in the chat
Intake is only half of it. When work on a ticket the user raised here produces a client-facing update, that update is delivered into the same Teams conversation — and the user’s reply goes straight back onto the ticket. The Teams thread and the ticket’s client-facing notes become two views of one exchange, so a user follows their ticket without leaving Teams or digging through email.The user raises a ticket
A technician (or a Neo workflow) responds
It lands in the chat
The user replies in Teams
What counts as a client-facing update, per PSA
Each PSA models customer communication differently, so Neo keys off the signal that a technician intended the customer to see the update — by default, the ones your PSA would email the contact about. That deliberately skips the running internal commentary techs keep on a ticket, which would otherwise turn the chat into noise.- The relay is delivered in addition to your PSA’s own customer email, so a user who is actively chatting with the bot may receive both a Teams message and an email for the same update.
- A user receives chat updates only once they’ve messaged the bot at least once (so there’s a live conversation to deliver into). Before that, updates reach them through your PSA’s email as usual.
Consent and security
Two separate Microsoft identities are involved. It’s worth being precise about what each can do — for your own assurance and to answer a client admin’s questions. The bot (the app published into the client tenant) is messaging-only. Its manifest requests justidentity and messageTeamMembers — receive and send Teams messages, nothing else. It has no Microsoft Graph access in the client tenant: it can’t read mail, files, directory, or anything else there. Everything the agent does runs on your integrations under your permissions, and every end-user conversation is company-scoped (see What end users can access).
The Neo Installer is the app a client admin signs into when they open a magic install link. They grant it delegated AppCatalog.ReadWrite.All (plus openid and offline_access, so Neo can re-publish your branding later with Push update instead of asking for consent again) — the one permission needed to publish your app to their tenant’s catalog as that admin. It is not the bot, and it grants no standing access to the client’s data; its only job is the catalog publish. If you’d rather not have it in a tenant at all, use the manual zip path — no Neo Installer; you or the admin upload the package by hand.
Routing is authorized server-side, not by the app package. The Teams package carries your branding and the shared bot id — it carries no authority. When a message arrives, Neo trusts only Microsoft’s signed account of it: the message is authenticated by Microsoft’s Bot Framework, and the tenant it came from is the tenant ID Microsoft stamps on it — never anything in the manifest. Neo resolves which channel (and which of your agents) handles it from the install record for that (bot, tenant), and the company scope from that tenant’s Company. So a copied or edited package can’t make the bot answer as a different MSP’s channel, reach a tenant it wasn’t installed in, or widen a conversation beyond the end user’s company.
A registration is a claim until it’s proven. When you register a tenant under White-label installs, the binding is unverified until a tenant admin completes a magic-link consent, or the bot first receives a Microsoft-verified message from that tenant — then it’s verified and locked to your channel. An unverified claim can be replaced (register the wrong tenant ID, or two providers race on the same one, and a real install wins); a verified install can’t be taken over — to move it, remove the holding channel’s registration first. Installs into your own tenant are verified automatically.
Updating the bot after rollout
What you can change without touching the client tenant, and what needs the app re-published:Automating with GDAP (CIPP-style)
If you run delegated admin (GDAP) across your clients, you don’t need to wait on each client’s admin — open the install link yourself for any tenant you administer (you’ll sign in with your delegated admin rights). For full automation, the same publish is a Microsoft Graph call against the client tenant with a delegated admin token holdingAppCatalog.ReadWrite.All — POST /appCatalogs/teamsApps with the package from Teams app package (then POST .../appDefinitions to update) — which slots into a CIPP-style runbook. (Graph’s Teams-catalog publish is delegated-only; there is no app-only equivalent.)
Offboarding a client
Remove the company’s row under White-label installs — routing stops immediately and the bot no longer responds in that tenant. Then have the client’s admin remove the app from their Teams admin center so users don’t message a dead bot.Troubleshooting
The admin approved the link but got an error
The admin approved the link but got an error
Publishing failed — the tenant blocks custom apps
Publishing failed — the tenant blocks custom apps
The install fails with AADSTS650051 — 'service principal name is already present'
The install fails with AADSTS650051 — 'service principal name is already present'
AADSTS650051.The catch: a soft-deleted service principal is not listed on the Entra portal’s Deleted applications page — that page shows deleted App registrations, not deleted Enterprise apps. Find and purge it with Microsoft Graph (Graph Explorer works), then re-open the link:GET https://graph.microsoft.com/v1.0/directory/deletedItems/microsoft.graph.servicePrincipal?$filter=appId eq 'a77de2a9-75e6-4627-b50c-82c19e5d28b4'— the Neo Installer’s app ID is the same in every tenant.DELETE https://graph.microsoft.com/v1.0/directory/deletedItems/{id}, using theidfrom step 1, to permanently remove it.
Push update lists a tenant that needs attention
Push update lists a tenant that needs attention
Users got a 'finishing setup' greeting instead of my welcome message
Users got a 'finishing setup' greeting instead of my welcome message
The bot doesn't respond at all
The bot doesn't respond at all
A user can't chat, gets no reply, or their chat box is greyed out
A user can't chat, gets no reply, or their chat box is greyed out
It answers 1:1 but ignores group chats
It answers 1:1 but ignores group chats
/reset works in groups even without a mention.The bot says the app isn't fully set up and to contact the IT provider
The bot says the app isn't fully set up and to contact the IT provider
I can't add the company to White-label installs
I can't add the company to White-label installs