> ## Documentation Index
> Fetch the complete documentation index at: https://docs.neoagent.io/llms.txt
> Use this file to discover all available pages before exploring further.
# Creating an API Token
> Create a dedicated Syncro user for Neo Agent and generate a Custom API token with the right permissions
Syncro authenticates with a single API token. Unlike ConnectWise or Autotask, Syncro has **no API-only user type** — every token belongs to a real Syncro user, and everything the token does is recorded as that user's work.
**Create a dedicated Syncro user for Neo first, and generate the token while signed in as that user.**
Without one, Neo's comments, ticket edits and time entries appear as a named technician's own work — you cannot tell Neo's activity from theirs in the ticket history or in customer-facing comments. The token also dies with the user: deactivate that person and the integration stops.
## Before you start
Complete [Creating a Security Group](/integrations/psa/syncro/creating-security-group) first — the `Neo Agent SG` group must exist and be assigned to your Neo user.
Syncro limits a token to the permissions of the user creating it: *"The permissions available for selection are limited by the permissions of the current user."*
So the Neo user must already **hold** every permission you want on the token — anything it lacks is greyed out and cannot be ticked. And you must **sign in as the Neo user** to create the token. Creating it while signed in as yourself binds the token to *your* account, which defeats the point of a dedicated user.
## Step 1 — Open API Tokens
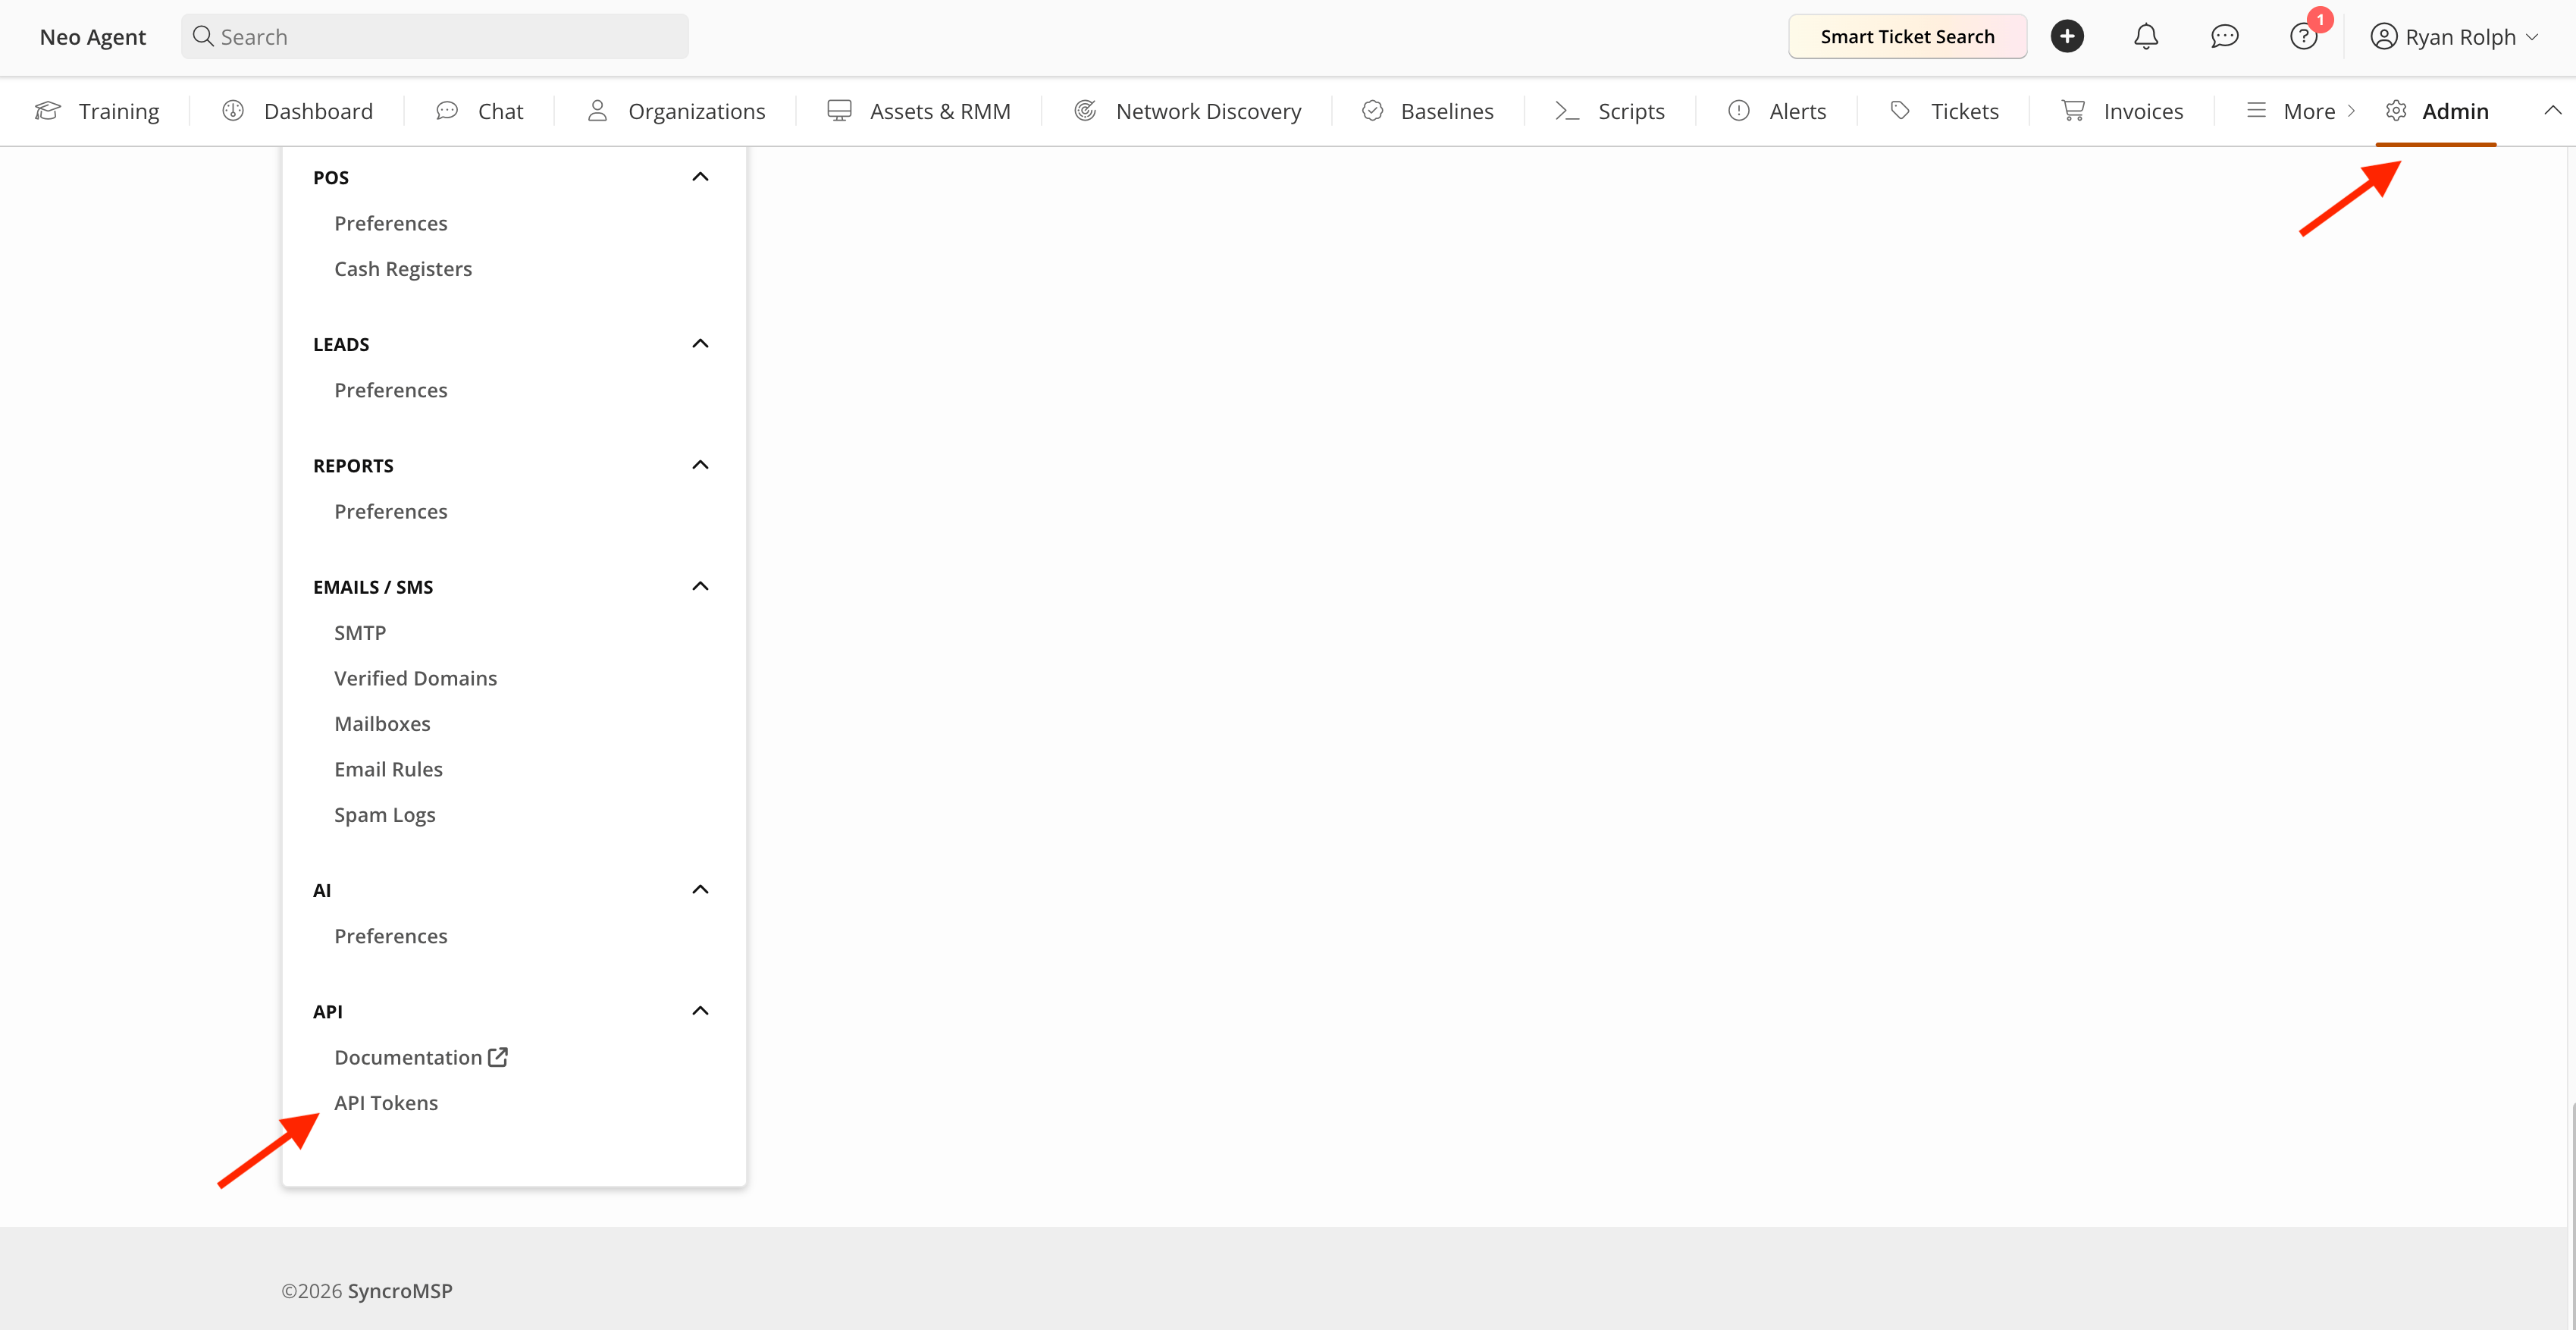
Signed in as the Neo user, go to **Admin → API → API Tokens**.
 ## Step 2 — Create a new token
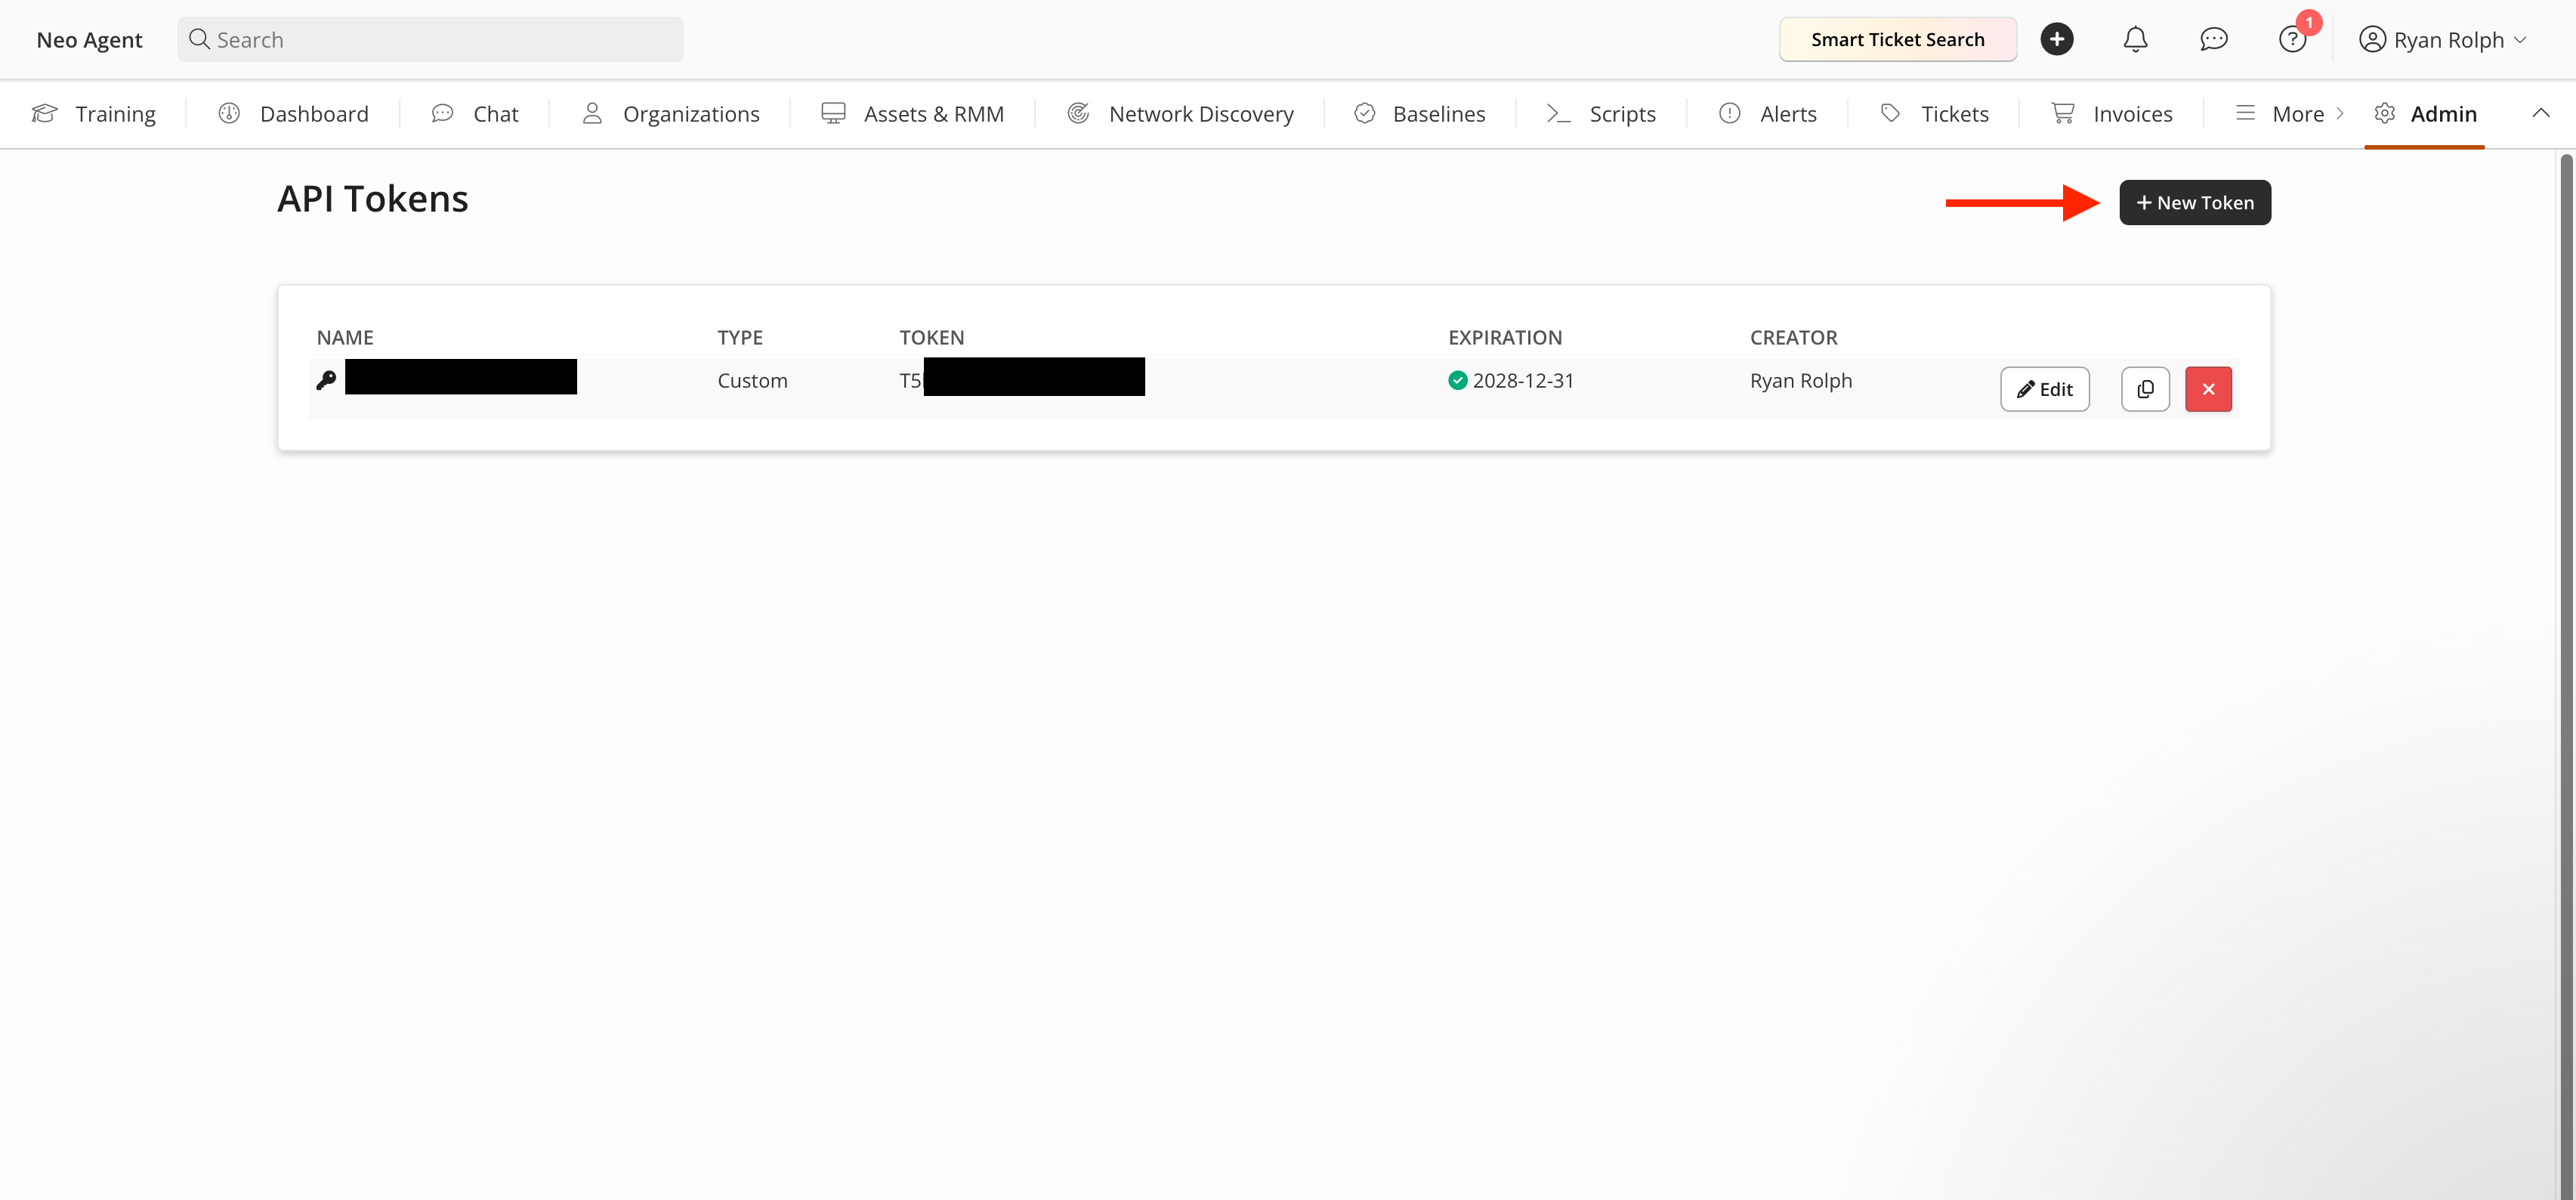
Click **New Token**.
## Step 2 — Create a new token
Click **New Token**.
 ## Step 3 — Choose Custom Permissions
Select the **Custom Permissions** tab — not **App Integration**. Name the token `Neo Agent`.
## Step 3 — Choose Custom Permissions
Select the **Custom Permissions** tab — not **App Integration**. Name the token `Neo Agent`.
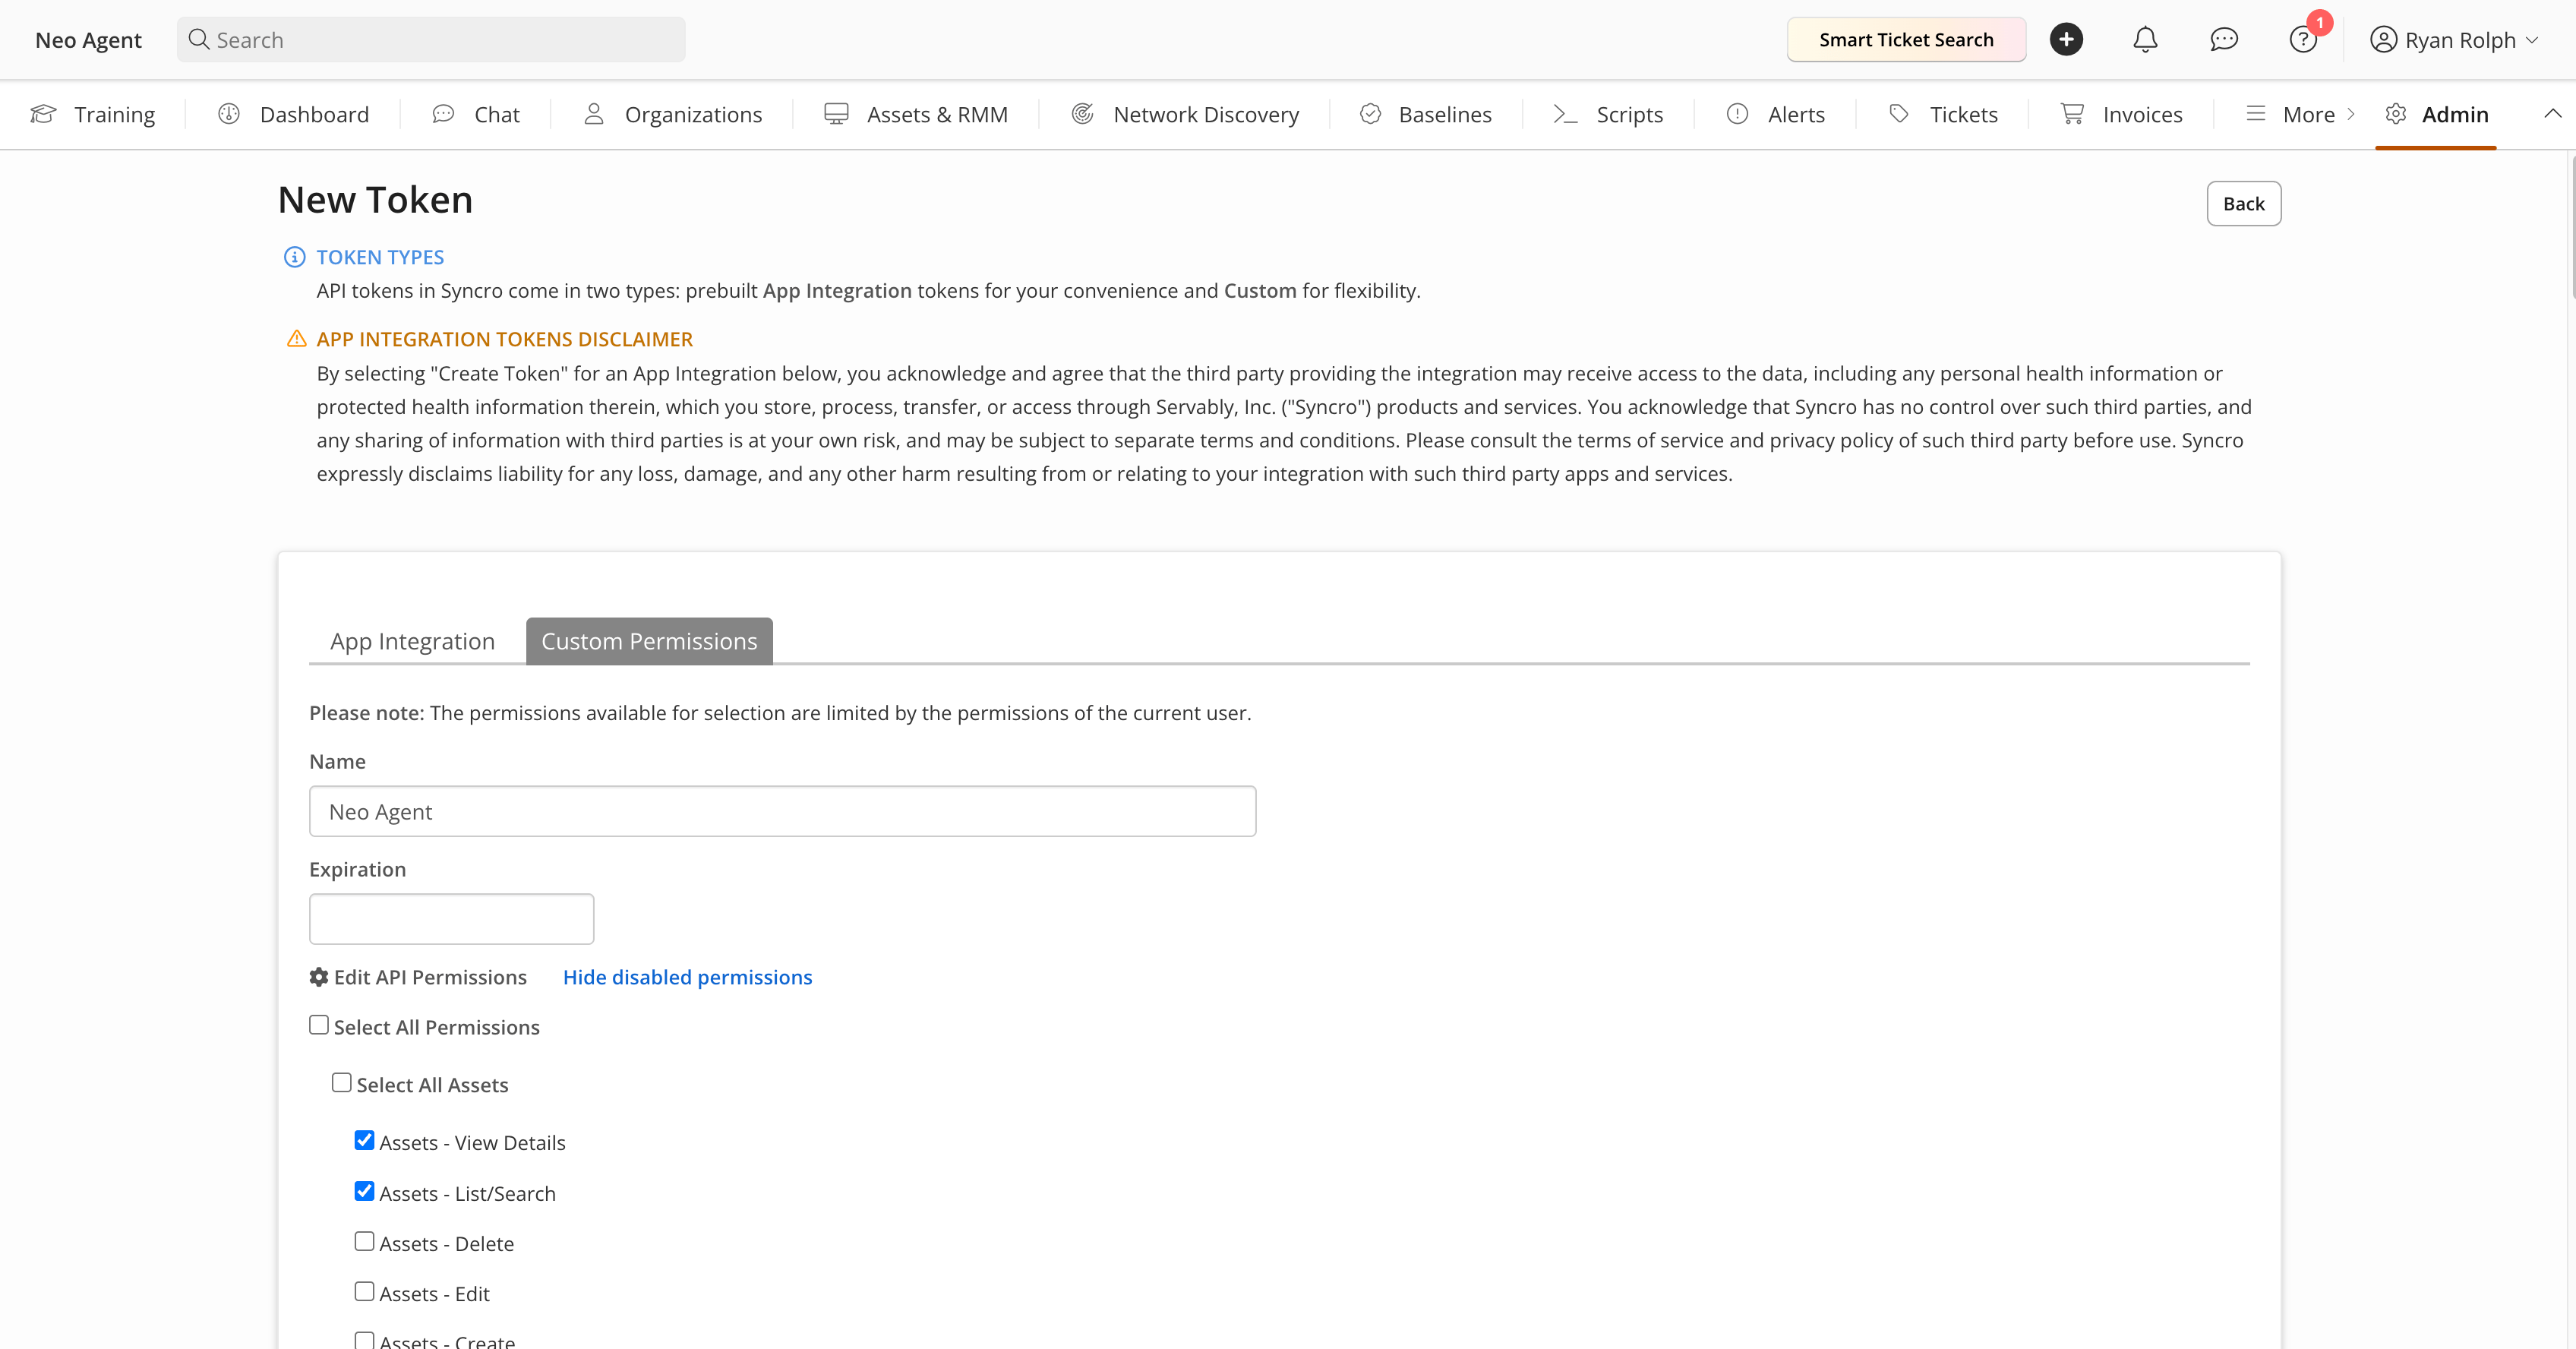 **Expiration**: leave it blank for a token that does not expire, or set a date and diarise the renewal. Syncro tokens are static — there is no refresh — so when a token expires the integration stops working until you paste a new one into Neo.
## Step 4 — Select the token permissions
Tick **Select All Permissions**.
That is safe here, and it is the reason the security group comes first: Syncro only offers permissions the Neo user holds, so "all" means *all of the security group* — which you already scoped in the previous step. Nothing beyond it can be granted.
Selecting all also means you never revisit the token as you enable more automations in Neo. To tighten or widen what Neo can reach, change the **security group** — that is the single place access is controlled.
If you would rather tick individual boxes, these are the permissions to grant the token:
**Tickets**
* Tickets - List/Search
* Tickets - View Details
* Tickets - View 'Their Ticket' Details (assigned to them)
* Tickets - Create
* Tickets - Edit
* Tickets - Merge
* Tickets - Use Ticket Charges
* Ticket Comments - New
* Ticket Custom Fields - Manage
* Ticket Canned Responses - Manage
* Ticket SLA - Edit
* Ticket Blueprints - Manage
* Ticket Blueprints - Create Ticket From Blueprint
* Ticket Timers - Overview
* Timelogs - Manage
**Customers and contracts**
* Customers - List/Search
* Customers - View Detail
* Contracts - List/Search
* Contracts - Edit
**Assets, RMM and scripts**
* Assets - List/Search
* Assets - View Details
* RMM Alerts - List
* RMM Alerts - Create
* RMM Alerts - Clear/Manage
* Scripts - Execute
* Policies - List
**Billing and inventory**
* Products - List/Search
* Products - Create
* Products - Edit
* Products - Edit Quantities
* Products - View Cost
* Pending Orders - View All
* Estimates - List/Search
* Estimates - View Details
* Estimates - Create
* Estimates - Edit
* Invoices - List/Search
* Invoices - View Details
* Line Item - View Cost
**Other**
* Appointments - View All (see-own never restricted)
* Documentation - Allow Usage
* Documentation - Create
* Documentation - Edit
* Reports - View
Of these, Neo hard-validates only **Tickets - List/Search**, **Tickets - View Details**, **Tickets - Create**, **Tickets - Edit**, **Ticket Comments - New**, **Customers - List/Search** and **Customers - View Detail** — it refuses to save a token without them. The rest back capabilities you can enable later in the dashboard (time logging, scripts, RMM alerts, documentation, billing reads), so granting them now means you do not have to come back to the token.
## Step 5 — Save and copy the token
Save the token, then copy its value from the tokens list. Paste it straight into Neo — Syncro will not show it again in full.
## What Neo checks when you connect
Neo validates the token before saving it and rejects it with a specific message if:
| Problem | What to change |
| ------------------------------------------------------------ | ------------------------------------------------------------------------------------------------------------------------------------- |
| The token is limited to its own tickets | Clear the "mine only" restriction — Neo needs to see every ticket to sync and automate. Otherwise sync silently covers only a subset. |
| Missing Tickets read, Tickets write, or Customers read | Grant the named permission. These three are the minimum for any Syncro connection. |
| The token belongs to a different Syncro account than the URL | Use the token from the same Syncro account as the URL you entered. |
## Next Steps
Enter your Syncro URL and this token in the Neo dashboard.
**Expiration**: leave it blank for a token that does not expire, or set a date and diarise the renewal. Syncro tokens are static — there is no refresh — so when a token expires the integration stops working until you paste a new one into Neo.
## Step 4 — Select the token permissions
Tick **Select All Permissions**.
That is safe here, and it is the reason the security group comes first: Syncro only offers permissions the Neo user holds, so "all" means *all of the security group* — which you already scoped in the previous step. Nothing beyond it can be granted.
Selecting all also means you never revisit the token as you enable more automations in Neo. To tighten or widen what Neo can reach, change the **security group** — that is the single place access is controlled.
If you would rather tick individual boxes, these are the permissions to grant the token:
**Tickets**
* Tickets - List/Search
* Tickets - View Details
* Tickets - View 'Their Ticket' Details (assigned to them)
* Tickets - Create
* Tickets - Edit
* Tickets - Merge
* Tickets - Use Ticket Charges
* Ticket Comments - New
* Ticket Custom Fields - Manage
* Ticket Canned Responses - Manage
* Ticket SLA - Edit
* Ticket Blueprints - Manage
* Ticket Blueprints - Create Ticket From Blueprint
* Ticket Timers - Overview
* Timelogs - Manage
**Customers and contracts**
* Customers - List/Search
* Customers - View Detail
* Contracts - List/Search
* Contracts - Edit
**Assets, RMM and scripts**
* Assets - List/Search
* Assets - View Details
* RMM Alerts - List
* RMM Alerts - Create
* RMM Alerts - Clear/Manage
* Scripts - Execute
* Policies - List
**Billing and inventory**
* Products - List/Search
* Products - Create
* Products - Edit
* Products - Edit Quantities
* Products - View Cost
* Pending Orders - View All
* Estimates - List/Search
* Estimates - View Details
* Estimates - Create
* Estimates - Edit
* Invoices - List/Search
* Invoices - View Details
* Line Item - View Cost
**Other**
* Appointments - View All (see-own never restricted)
* Documentation - Allow Usage
* Documentation - Create
* Documentation - Edit
* Reports - View
Of these, Neo hard-validates only **Tickets - List/Search**, **Tickets - View Details**, **Tickets - Create**, **Tickets - Edit**, **Ticket Comments - New**, **Customers - List/Search** and **Customers - View Detail** — it refuses to save a token without them. The rest back capabilities you can enable later in the dashboard (time logging, scripts, RMM alerts, documentation, billing reads), so granting them now means you do not have to come back to the token.
## Step 5 — Save and copy the token
Save the token, then copy its value from the tokens list. Paste it straight into Neo — Syncro will not show it again in full.
## What Neo checks when you connect
Neo validates the token before saving it and rejects it with a specific message if:
| Problem | What to change |
| ------------------------------------------------------------ | ------------------------------------------------------------------------------------------------------------------------------------- |
| The token is limited to its own tickets | Clear the "mine only" restriction — Neo needs to see every ticket to sync and automate. Otherwise sync silently covers only a subset. |
| Missing Tickets read, Tickets write, or Customers read | Grant the named permission. These three are the minimum for any Syncro connection. |
| The token belongs to a different Syncro account than the URL | Use the token from the same Syncro account as the URL you entered. |
## Next Steps
Enter your Syncro URL and this token in the Neo dashboard.