> ## Documentation Index
> Fetch the complete documentation index at: https://docs.neoagent.io/llms.txt
> Use this file to discover all available pages before exploring further.
# Connecting to Neo Agent
> Configure the connection between your ServiceNow instance and Neo Agent using OAuth
Once you've [created your OAuth Application Registry entry](/integrations/psa/servicenow/creating-oauth-app), you can connect ServiceNow to Neo Agent through the integrations dashboard.
Unlike ConnectWise or Halo, ServiceNow uses an **OAuth consent flow**. After entering your credentials in the Neo dashboard, a popup window opens to your own ServiceNow instance where an admin approves access. The popup auto-closes when consent completes.
## Required Information
Before starting the connection process, gather the following from the previous step:
Your ServiceNow instance URL — for example `https://acme.service-now.com`. Must use HTTPS, no trailing slash, no path. FedRAMP / Government Community Cloud customers can also use `*.servicenowservices.com` instances.
The Client ID auto-generated when you saved your OAuth Application Registry entry.
The Client Secret from your OAuth Application Registry entry. Treat this like a password — Neo stores it encrypted in our Key Vault and uses it only to refresh access tokens.
## Configuring the Integration
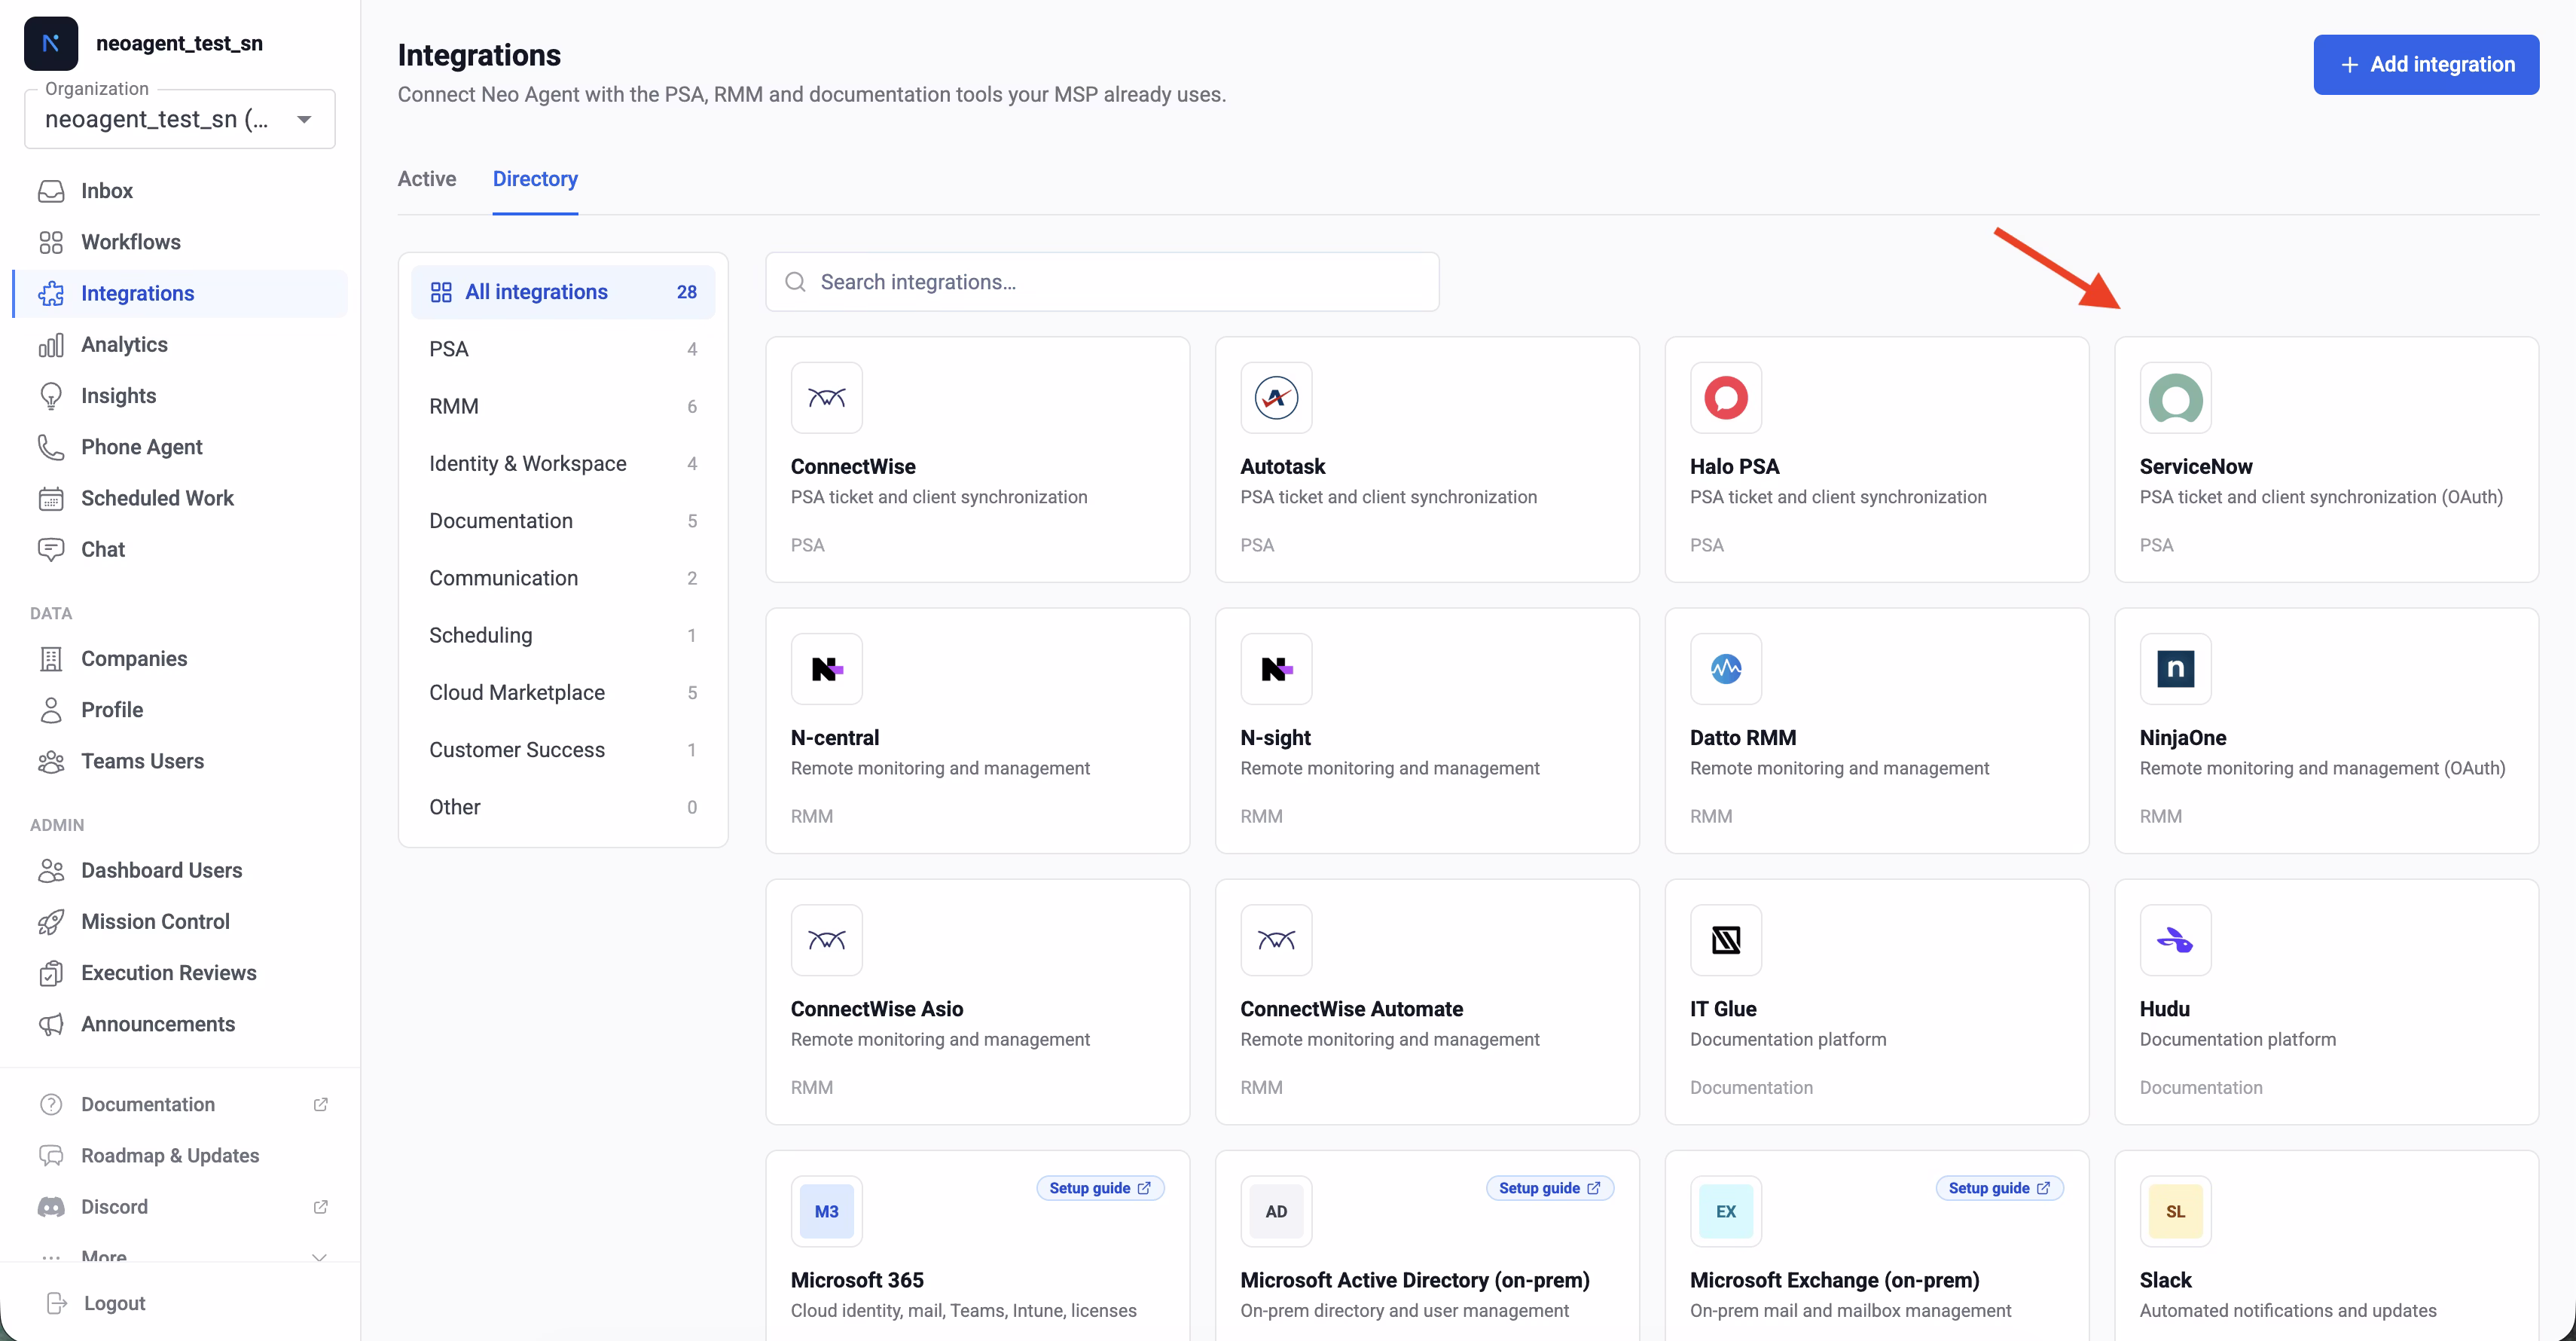
Navigate to the [Neo Agent Dashboard](https://dashboard.neoagent.io/integrations), open the **Directory** tab, and click the **ServiceNow** tile.
 Fill in the three fields with the values you collected when [creating the OAuth application](/integrations/psa/servicenow/creating-oauth-app):
* **Instance URL**: e.g. `https://acme.service-now.com`
* **Client ID**: the Client ID from your OAuth Application Registry entry
* **Client Secret**: the Client Secret from the same entry
Fill in the three fields with the values you collected when [creating the OAuth application](/integrations/psa/servicenow/creating-oauth-app):
* **Instance URL**: e.g. `https://acme.service-now.com`
* **Client ID**: the Client ID from your OAuth Application Registry entry
* **Client Secret**: the Client Secret from the same entry
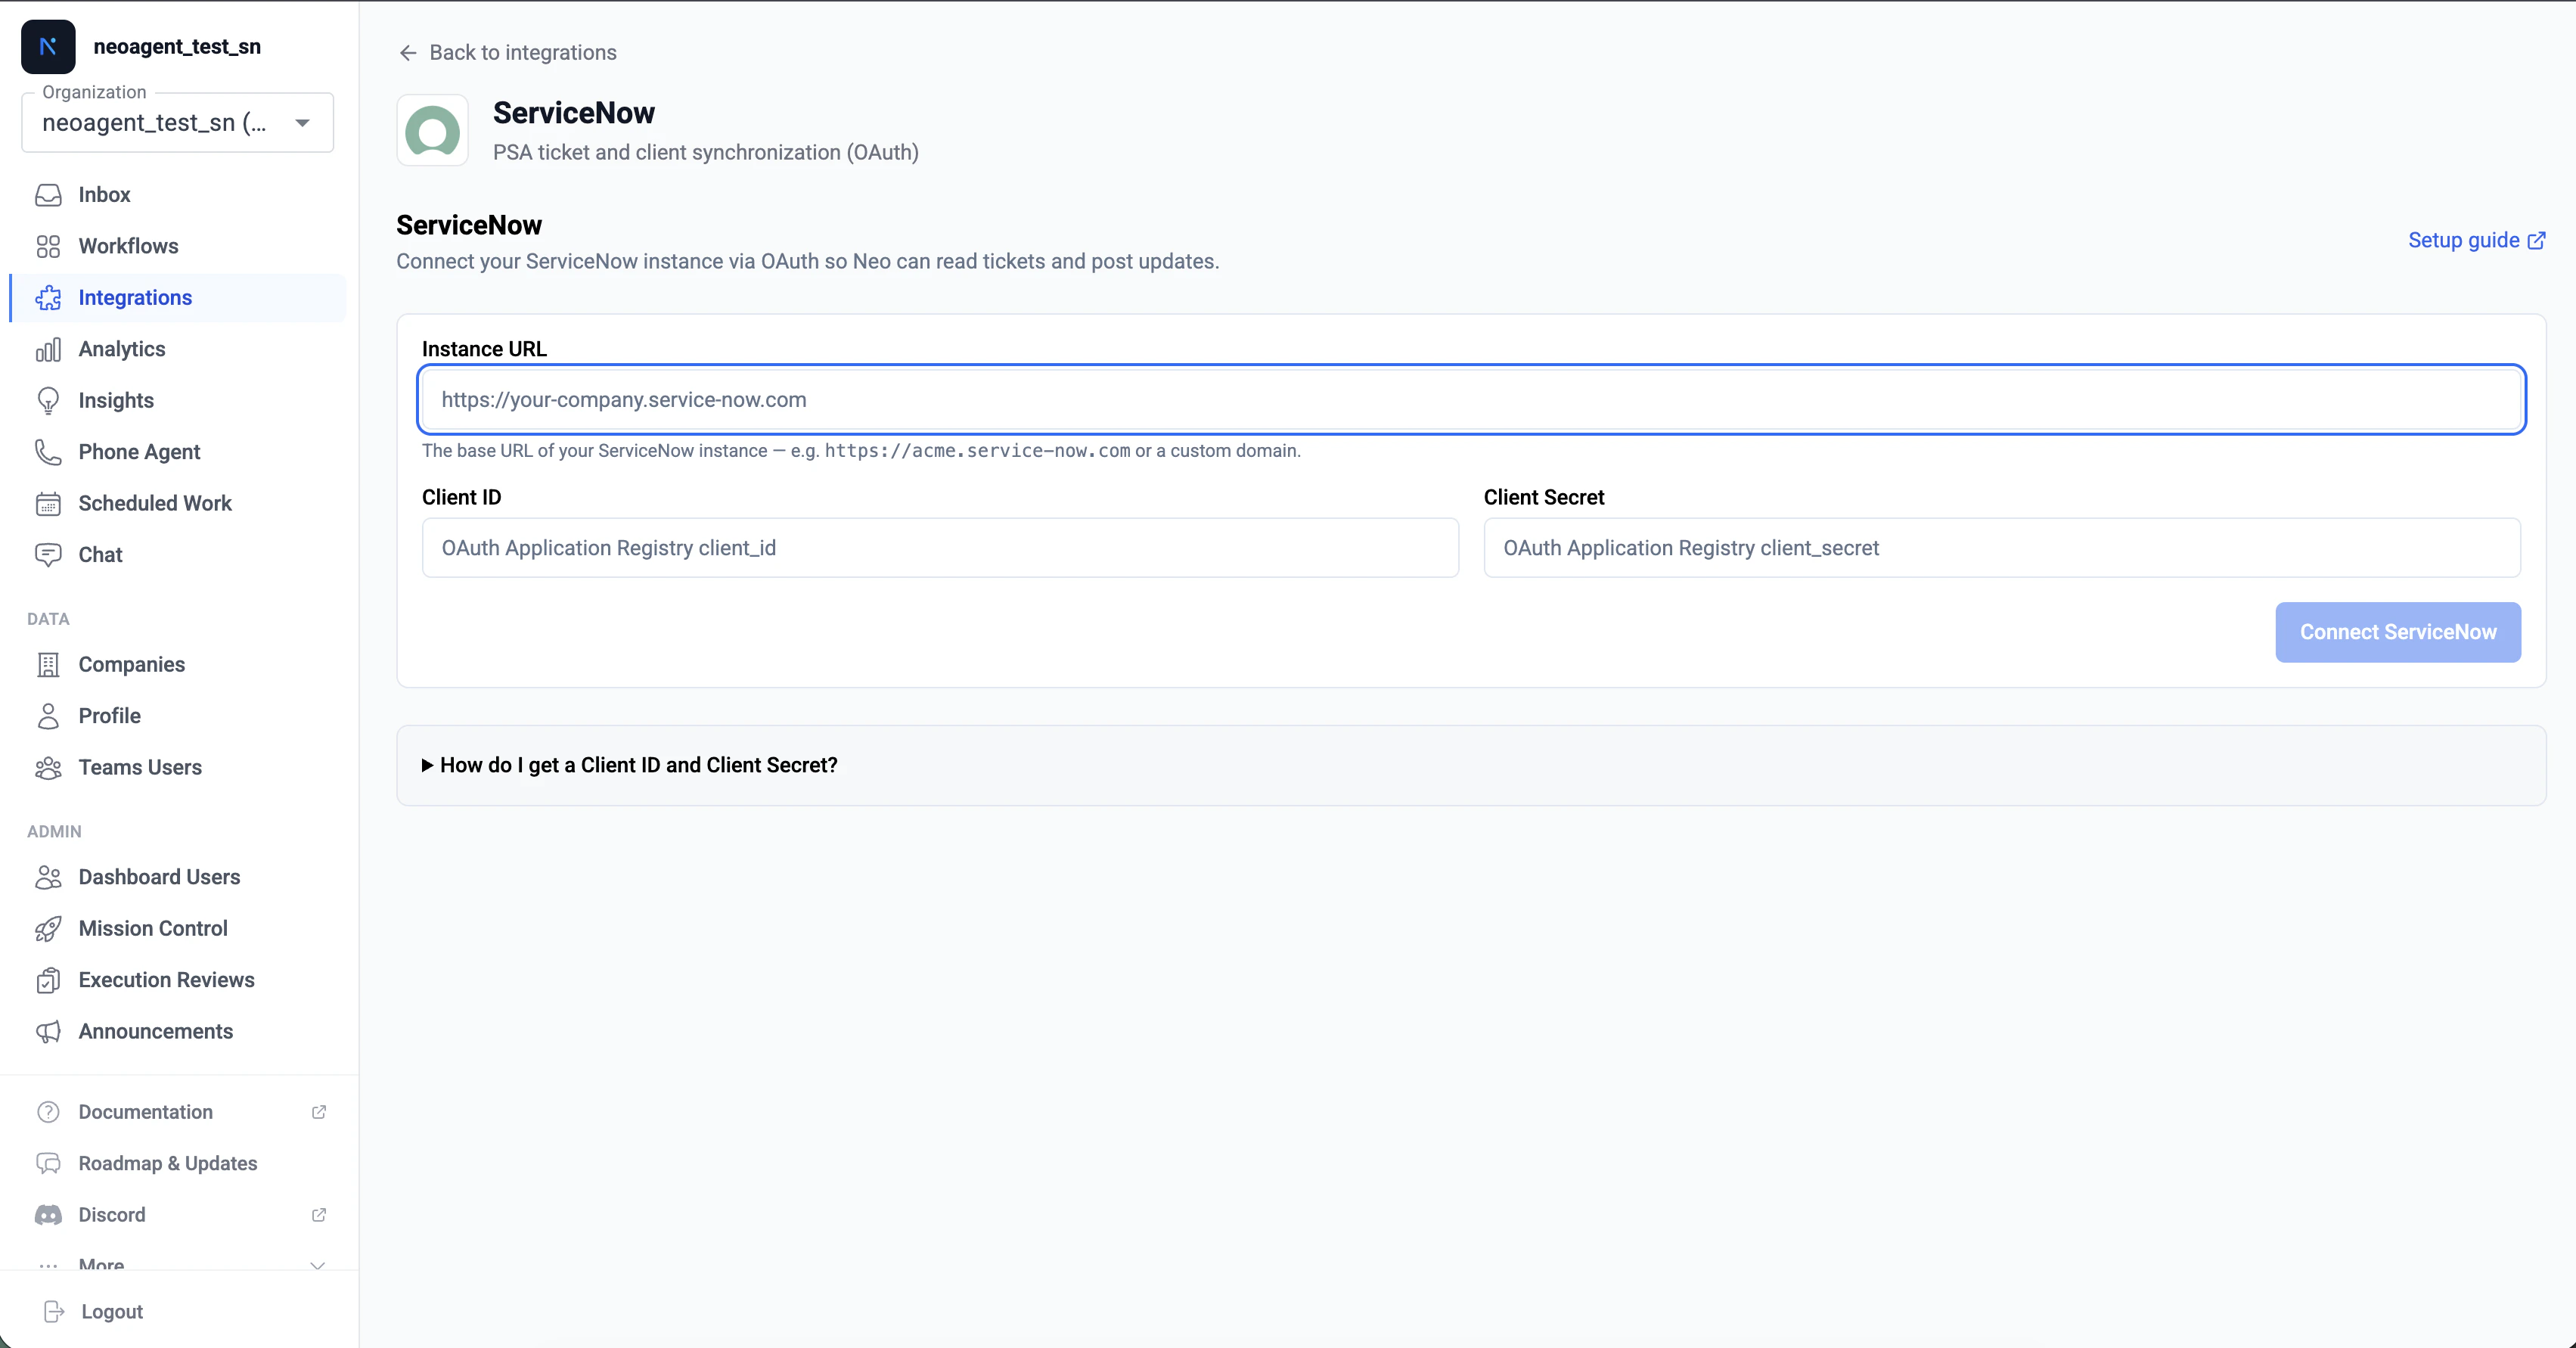 Click **Connect ServiceNow**. The dashboard will open a popup window pointed at your ServiceNow instance's OAuth consent page.
If your browser blocks the popup, the dashboard falls back to a full-page redirect. Either flow works — the result is the same.
The popup loads your ServiceNow instance and prompts a user to approve Neo Agent's access.
Click **Connect ServiceNow**. The dashboard will open a popup window pointed at your ServiceNow instance's OAuth consent page.
If your browser blocks the popup, the dashboard falls back to a full-page redirect. Either flow works — the result is the same.
The popup loads your ServiceNow instance and prompts a user to approve Neo Agent's access.
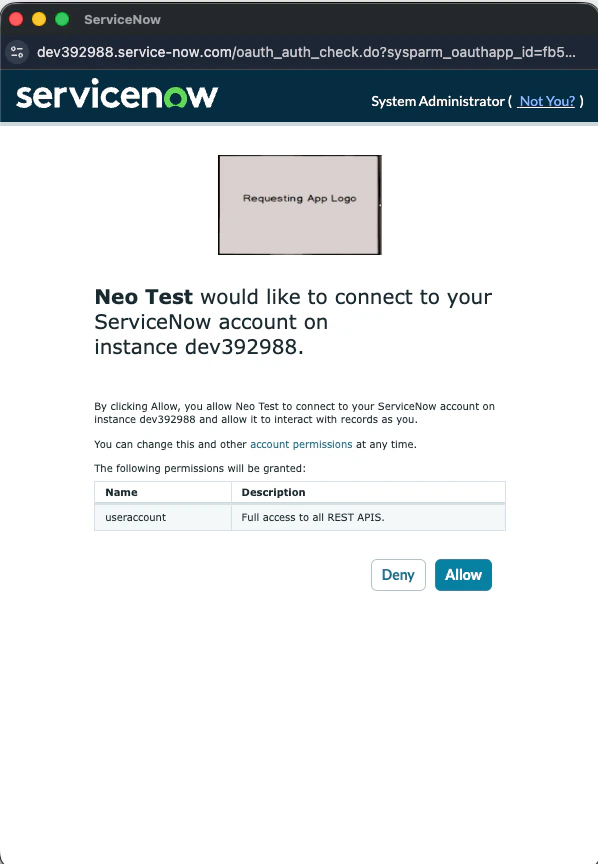 **Before clicking Allow**, make sure the active ServiceNow session belongs to the dedicated Neo service account (`Neo Agent` user, or whatever you named it on the [previous step](/integrations/psa/servicenow/creating-oauth-app)). If a different user is signed in, log out of ServiceNow first, then sign in as the service account, then click Allow.
The popup closes automatically when consent completes and the dashboard updates to show the integration as connected.
**The user who clicks Allow becomes Neo's identity in ServiceNow.** Every note, comment, state change, and time entry Neo creates is attributed to that user in your audit trail. The `assigned_to` field on tickets Neo claims also points at that user. This is a one-click decision with permanent audit-trail consequences — make sure the correct user is signed in.
If you click Allow as a personal admin account (e.g. your own user record), Neo will look like *you* in every audit log entry, your assignment queue will fill with Neo-claimed tickets, and the integration breaks the day you leave the org or your account is disabled. Use the dedicated service account.
Behind the scenes, Neo automatically reads the OAuth user's `sys_id` after consent and stores it as Neo's identity for ticket assignment and write attribution. You don't need to enter it anywhere — it's resolved from the OAuth grant itself. To change Neo's identity later, log out of ServiceNow, sign back in as the new user, and click **Reconnect** in the Neo dashboard.
Back in the Neo dashboard, you should see a green **ServiceNow connected** banner with your instance URL displayed.
Behind the scenes, Neo automatically:
1. Validated the OAuth refresh token by fetching an access token
2. Provisioned a **Business Rule** on the parent `task` table in your ServiceNow instance (named **Neo Agent — Task Webhook**) — fires on every task-family subclass via SN's table inheritance
3. Created a **System Property** (`x_neoagent.callback_url`) holding the per-tenant callback URL the Business Rule POSTs to
4. Set the integration's sync state to **READY\_TO\_SYNC**
A successful connection means Neo has both API access (for reads and writes) and webhook delivery (for real-time event notifications). No further ServiceNow-side configuration is required.
## Troubleshooting Connection Issues
If you encounter issues during the connect flow, check the following:
* Make sure the URL starts with `https://` (not `http://`)
* The hostname must end with `.service-now.com` or `.servicenowservices.com` (FedRAMP/GovCloud customers)
* Don't include a path — just the bare host. `https://acme.service-now.com` is correct, `https://acme.service-now.com/now` is not
* Vanity URLs are not supported here. Use the canonical platform admin URL even if your end users access ServiceNow via a custom hostname
* Verify the Client ID matches the OAuth Application Registry entry exactly — copy-paste, don't retype
* Check the Client Secret was copied correctly without extra spaces or newline characters
* Confirm the OAuth application is set to **Active** in ServiceNow
* If you regenerated the Client Secret in ServiceNow, update it in Neo via the **Reconnect** button
* The Redirect URL on your OAuth Application Registry entry probably doesn't match. Verify it's exactly: `https://dashboard.neoagent.io/oauth/servicenow/callback`
* Extra trailing slashes, query parameters, or `http://` (instead of `https://`) will cause this. The match must be byte-for-byte
* The user that approved consent doesn't have the `itil` role — Neo can authenticate but can't read tickets
* In ServiceNow, navigate to the user record and assign the `itil` role (or your equivalent role with Table API read/write on the `task` family)
* Click **Reconnect** in the Neo dashboard to retry — the new permissions take effect on the next refresh
* Neo's "Email (sent via PSA)" notification mode hits `/api/now/v1/email`, which requires the `email_api_send` role on the integration user (separate from `itil`)
* In ServiceNow, navigate to the user record and assign the `email_api_send` role
* No reconnect needed — the next workflow run will pick it up. Neo will also raise an inbox alert with this exact remediation when it sees the 403
* Check **System Definition → Business Rules** in ServiceNow for a rule named **Neo Agent — Task Webhook** on the `task` table. It should exist and be **Active**
* Verify **System Definition → System Properties** contains `x_neoagent.callback_url` pointing at a `https://...neoagent.io/callback/servicenow?...` URL
* If either is missing, click **Reconnect** in the Neo dashboard. The webhook provisioning step is idempotent — it's safe to re-run, and re-running fixes most provisioning failures (including removing the legacy `Neo Agent — Incident Webhook` rule on instances connected before mid-May 2026)
* See [Webhook Architecture](/integrations/psa/servicenow/webhook-architecture) for the full provisioning flow
* Confirm your ServiceNow instance is reachable from the public internet over HTTPS
* If you have IP allowlisting enabled in ServiceNow, [whitelist Neo Agent's IP address](/integrations/ip-whitelisting)
* The OAuth round-trip happens in the user's browser, but the ongoing API calls and webhook deliveries flow between Neo's backend and your ServiceNow instance directly
## What's Next?
Once connected, every task-family record on your ServiceNow instance — incidents, requests, request items, tasks, change requests, and problems — will start flowing through Neo's event pipeline. From here you can:
* **Build workflows** — create automated workflows that triage, route, comment, and resolve ServiceNow tickets. Use the **Ticket Type** filter in the rules-builder to scope a workflow to specific subclasses (e.g., *"fire on incidents and changes only"*)
* **Configure permissions** — fine-tune which areas Neo can read versus write in the Neo dashboard's permission groups
* **Train your team** — introduce your technicians to Neo Agent's capabilities and how to work with it
* **Monitor performance** — track Neo's impact on ticket resolution times and technician productivity
Start with simple workflows (e.g., auto-acknowledge a new incident with a courteous note) before enabling more autonomous behavior. This helps you build confidence in the integration before scaling up.
Your ServiceNow integration is now connected. Real-time webhook deliveries and API operations are both active.
**Before clicking Allow**, make sure the active ServiceNow session belongs to the dedicated Neo service account (`Neo Agent` user, or whatever you named it on the [previous step](/integrations/psa/servicenow/creating-oauth-app)). If a different user is signed in, log out of ServiceNow first, then sign in as the service account, then click Allow.
The popup closes automatically when consent completes and the dashboard updates to show the integration as connected.
**The user who clicks Allow becomes Neo's identity in ServiceNow.** Every note, comment, state change, and time entry Neo creates is attributed to that user in your audit trail. The `assigned_to` field on tickets Neo claims also points at that user. This is a one-click decision with permanent audit-trail consequences — make sure the correct user is signed in.
If you click Allow as a personal admin account (e.g. your own user record), Neo will look like *you* in every audit log entry, your assignment queue will fill with Neo-claimed tickets, and the integration breaks the day you leave the org or your account is disabled. Use the dedicated service account.
Behind the scenes, Neo automatically reads the OAuth user's `sys_id` after consent and stores it as Neo's identity for ticket assignment and write attribution. You don't need to enter it anywhere — it's resolved from the OAuth grant itself. To change Neo's identity later, log out of ServiceNow, sign back in as the new user, and click **Reconnect** in the Neo dashboard.
Back in the Neo dashboard, you should see a green **ServiceNow connected** banner with your instance URL displayed.
Behind the scenes, Neo automatically:
1. Validated the OAuth refresh token by fetching an access token
2. Provisioned a **Business Rule** on the parent `task` table in your ServiceNow instance (named **Neo Agent — Task Webhook**) — fires on every task-family subclass via SN's table inheritance
3. Created a **System Property** (`x_neoagent.callback_url`) holding the per-tenant callback URL the Business Rule POSTs to
4. Set the integration's sync state to **READY\_TO\_SYNC**
A successful connection means Neo has both API access (for reads and writes) and webhook delivery (for real-time event notifications). No further ServiceNow-side configuration is required.
## Troubleshooting Connection Issues
If you encounter issues during the connect flow, check the following:
* Make sure the URL starts with `https://` (not `http://`)
* The hostname must end with `.service-now.com` or `.servicenowservices.com` (FedRAMP/GovCloud customers)
* Don't include a path — just the bare host. `https://acme.service-now.com` is correct, `https://acme.service-now.com/now` is not
* Vanity URLs are not supported here. Use the canonical platform admin URL even if your end users access ServiceNow via a custom hostname
* Verify the Client ID matches the OAuth Application Registry entry exactly — copy-paste, don't retype
* Check the Client Secret was copied correctly without extra spaces or newline characters
* Confirm the OAuth application is set to **Active** in ServiceNow
* If you regenerated the Client Secret in ServiceNow, update it in Neo via the **Reconnect** button
* The Redirect URL on your OAuth Application Registry entry probably doesn't match. Verify it's exactly: `https://dashboard.neoagent.io/oauth/servicenow/callback`
* Extra trailing slashes, query parameters, or `http://` (instead of `https://`) will cause this. The match must be byte-for-byte
* The user that approved consent doesn't have the `itil` role — Neo can authenticate but can't read tickets
* In ServiceNow, navigate to the user record and assign the `itil` role (or your equivalent role with Table API read/write on the `task` family)
* Click **Reconnect** in the Neo dashboard to retry — the new permissions take effect on the next refresh
* Neo's "Email (sent via PSA)" notification mode hits `/api/now/v1/email`, which requires the `email_api_send` role on the integration user (separate from `itil`)
* In ServiceNow, navigate to the user record and assign the `email_api_send` role
* No reconnect needed — the next workflow run will pick it up. Neo will also raise an inbox alert with this exact remediation when it sees the 403
* Check **System Definition → Business Rules** in ServiceNow for a rule named **Neo Agent — Task Webhook** on the `task` table. It should exist and be **Active**
* Verify **System Definition → System Properties** contains `x_neoagent.callback_url` pointing at a `https://...neoagent.io/callback/servicenow?...` URL
* If either is missing, click **Reconnect** in the Neo dashboard. The webhook provisioning step is idempotent — it's safe to re-run, and re-running fixes most provisioning failures (including removing the legacy `Neo Agent — Incident Webhook` rule on instances connected before mid-May 2026)
* See [Webhook Architecture](/integrations/psa/servicenow/webhook-architecture) for the full provisioning flow
* Confirm your ServiceNow instance is reachable from the public internet over HTTPS
* If you have IP allowlisting enabled in ServiceNow, [whitelist Neo Agent's IP address](/integrations/ip-whitelisting)
* The OAuth round-trip happens in the user's browser, but the ongoing API calls and webhook deliveries flow between Neo's backend and your ServiceNow instance directly
## What's Next?
Once connected, every task-family record on your ServiceNow instance — incidents, requests, request items, tasks, change requests, and problems — will start flowing through Neo's event pipeline. From here you can:
* **Build workflows** — create automated workflows that triage, route, comment, and resolve ServiceNow tickets. Use the **Ticket Type** filter in the rules-builder to scope a workflow to specific subclasses (e.g., *"fire on incidents and changes only"*)
* **Configure permissions** — fine-tune which areas Neo can read versus write in the Neo dashboard's permission groups
* **Train your team** — introduce your technicians to Neo Agent's capabilities and how to work with it
* **Monitor performance** — track Neo's impact on ticket resolution times and technician productivity
Start with simple workflows (e.g., auto-acknowledge a new incident with a courteous note) before enabling more autonomous behavior. This helps you build confidence in the integration before scaling up.
Your ServiceNow integration is now connected. Real-time webhook deliveries and API operations are both active.