> ## Documentation Index
> Fetch the complete documentation index at: https://docs.neoagent.io/llms.txt
> Use this file to discover all available pages before exploring further.
# Creating an API Application
> Set up API credentials and configure authentication for Neo Agent to access your HaloPSA system
To enable Neo Agent to interact with your HaloPSA system programmatically, you need to create a dedicated API application with proper authentication credentials and permissions.
## How Neo Agent Permissions Work
Neo Agent uses **two layers of access control** to keep your HaloPSA data safe:
1. **HaloPSA API Application** (what you configure here) — sets the *maximum* API access available via OAuth scopes and the associated agent resource.
2. **Neo Agent Dashboard** — where you choose exactly what Neo can do. You configure **permission groups** that control which areas Neo can read, write, or ignore — and whether actions require technician approval first.
Think of it like onboarding a new team member: you give them an account so they *can* access the areas they need, then their manager decides which tasks they actually work on. The HaloPSA API application is the ceiling — Neo Agent's dashboard settings are the actual controls.
Granting API permissions here does not mean Neo Agent will use them all. It simply ensures Neo *can* operate when you enable a capability in the dashboard. You stay in control of what Neo actually does.
## Creating the API Application
Go to **Configuration → Integrations → HaloPSA API**, then click **View Applications** to see the applications list.
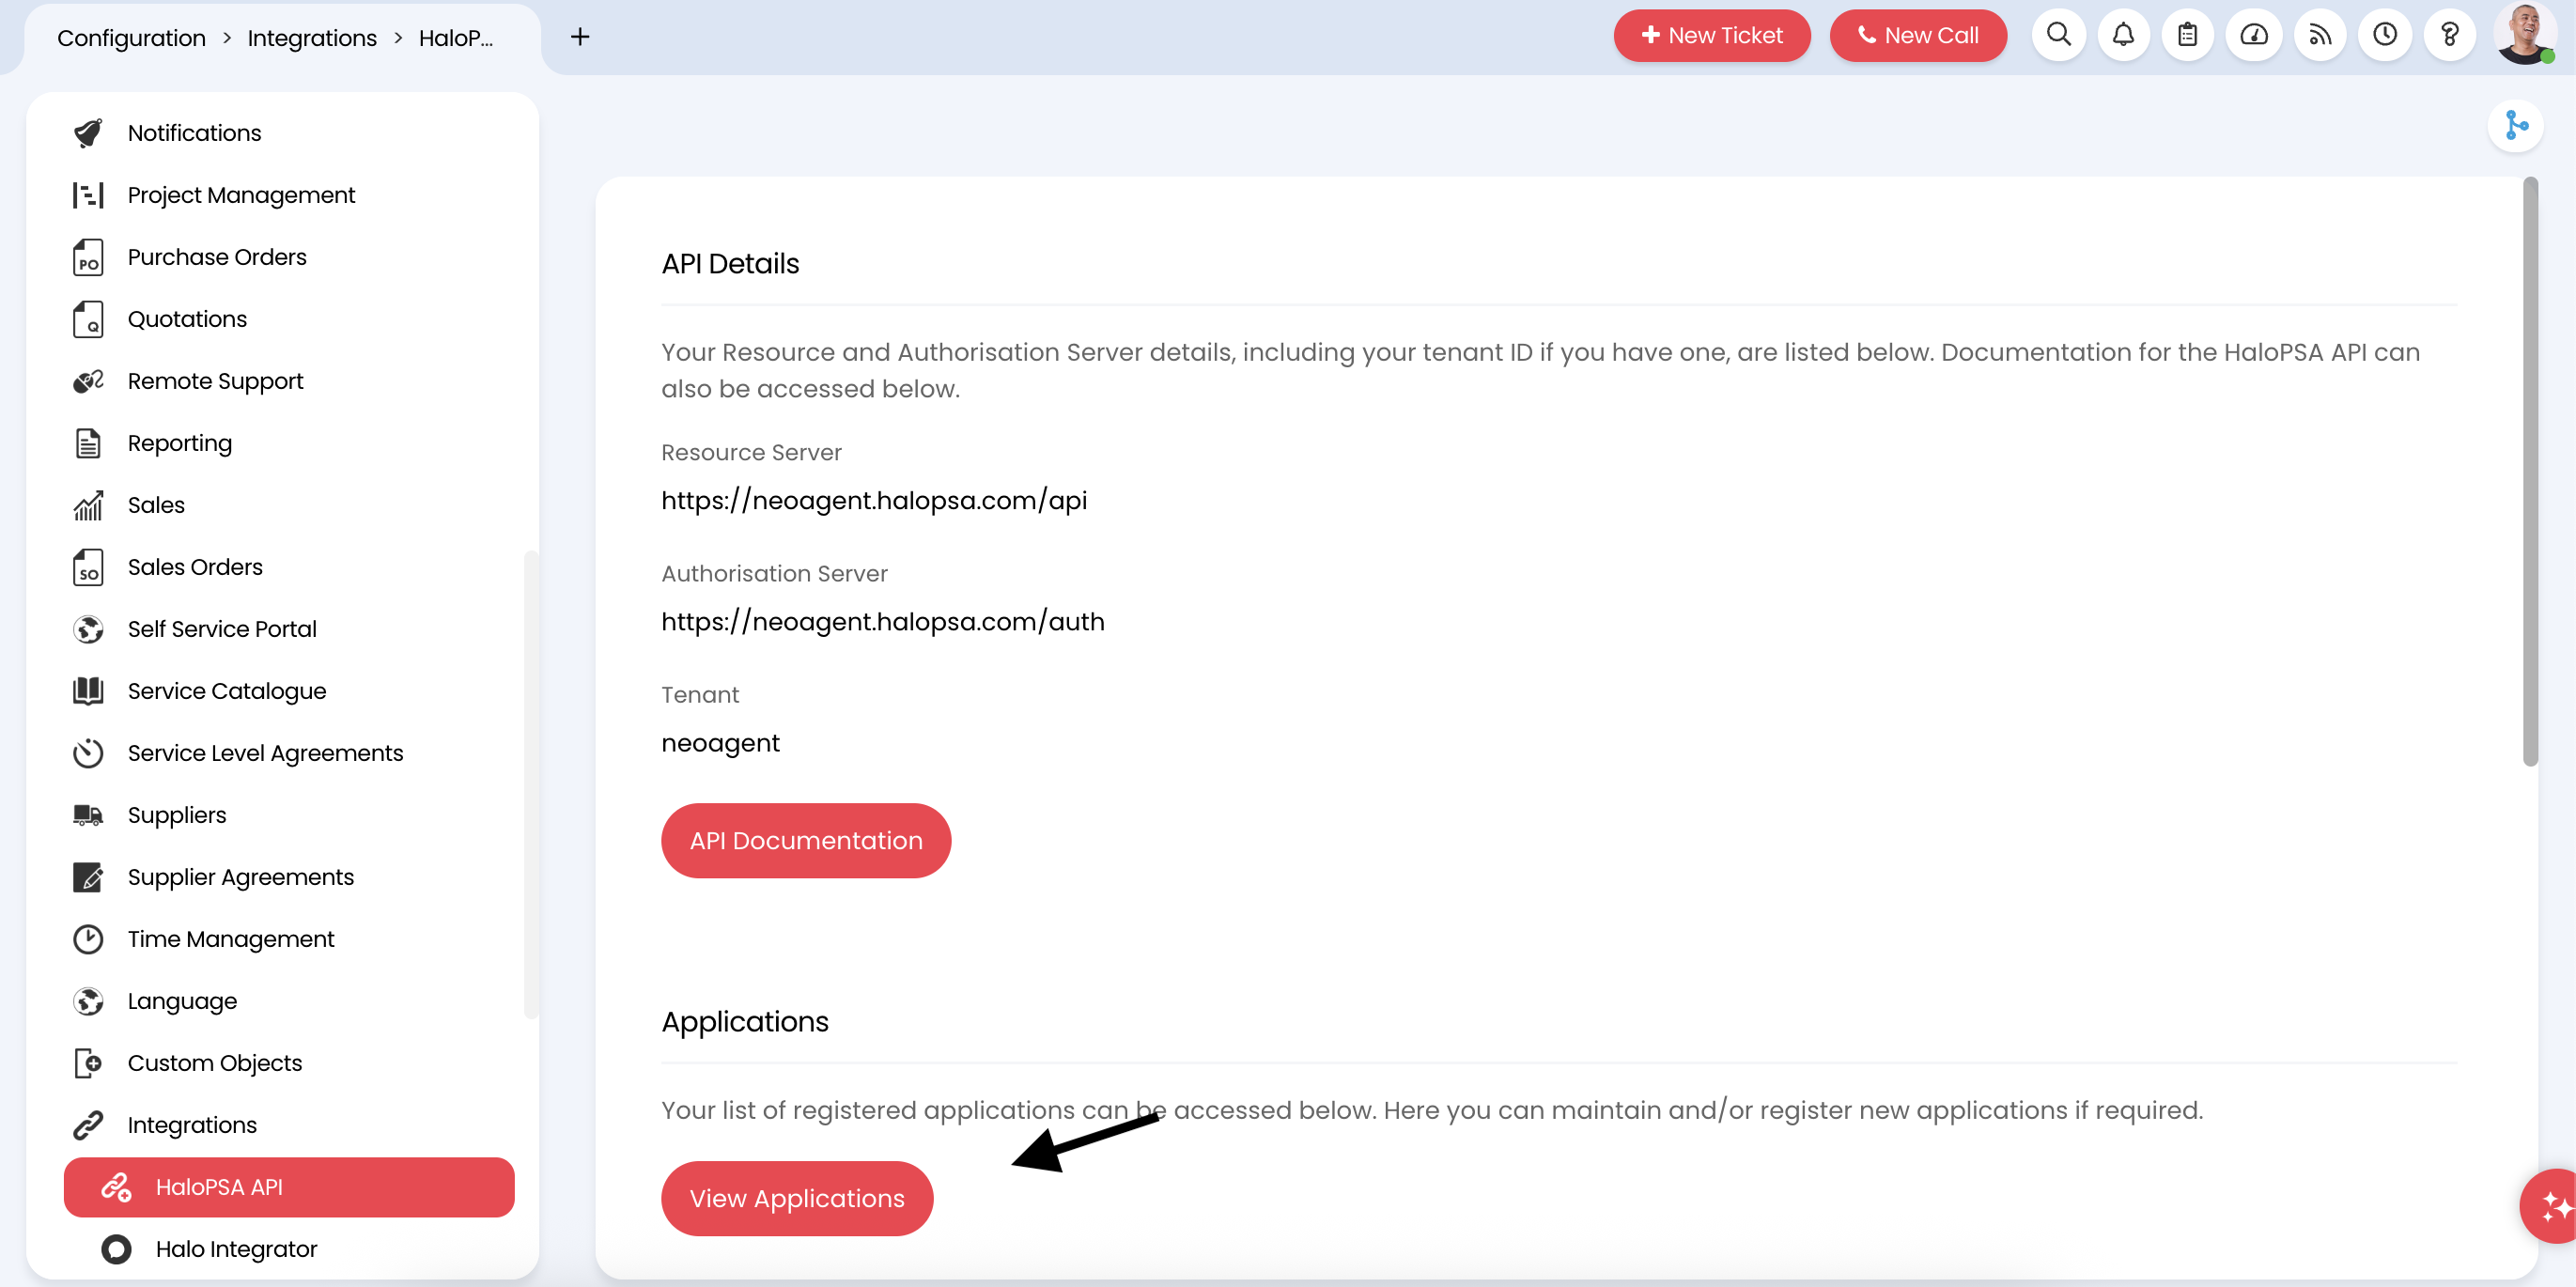 Click **New** to create a new application for Neo Agent.
Fill in the basic information for the new API application:
Click **New** to create a new application for Neo Agent.
Fill in the basic information for the new API application:
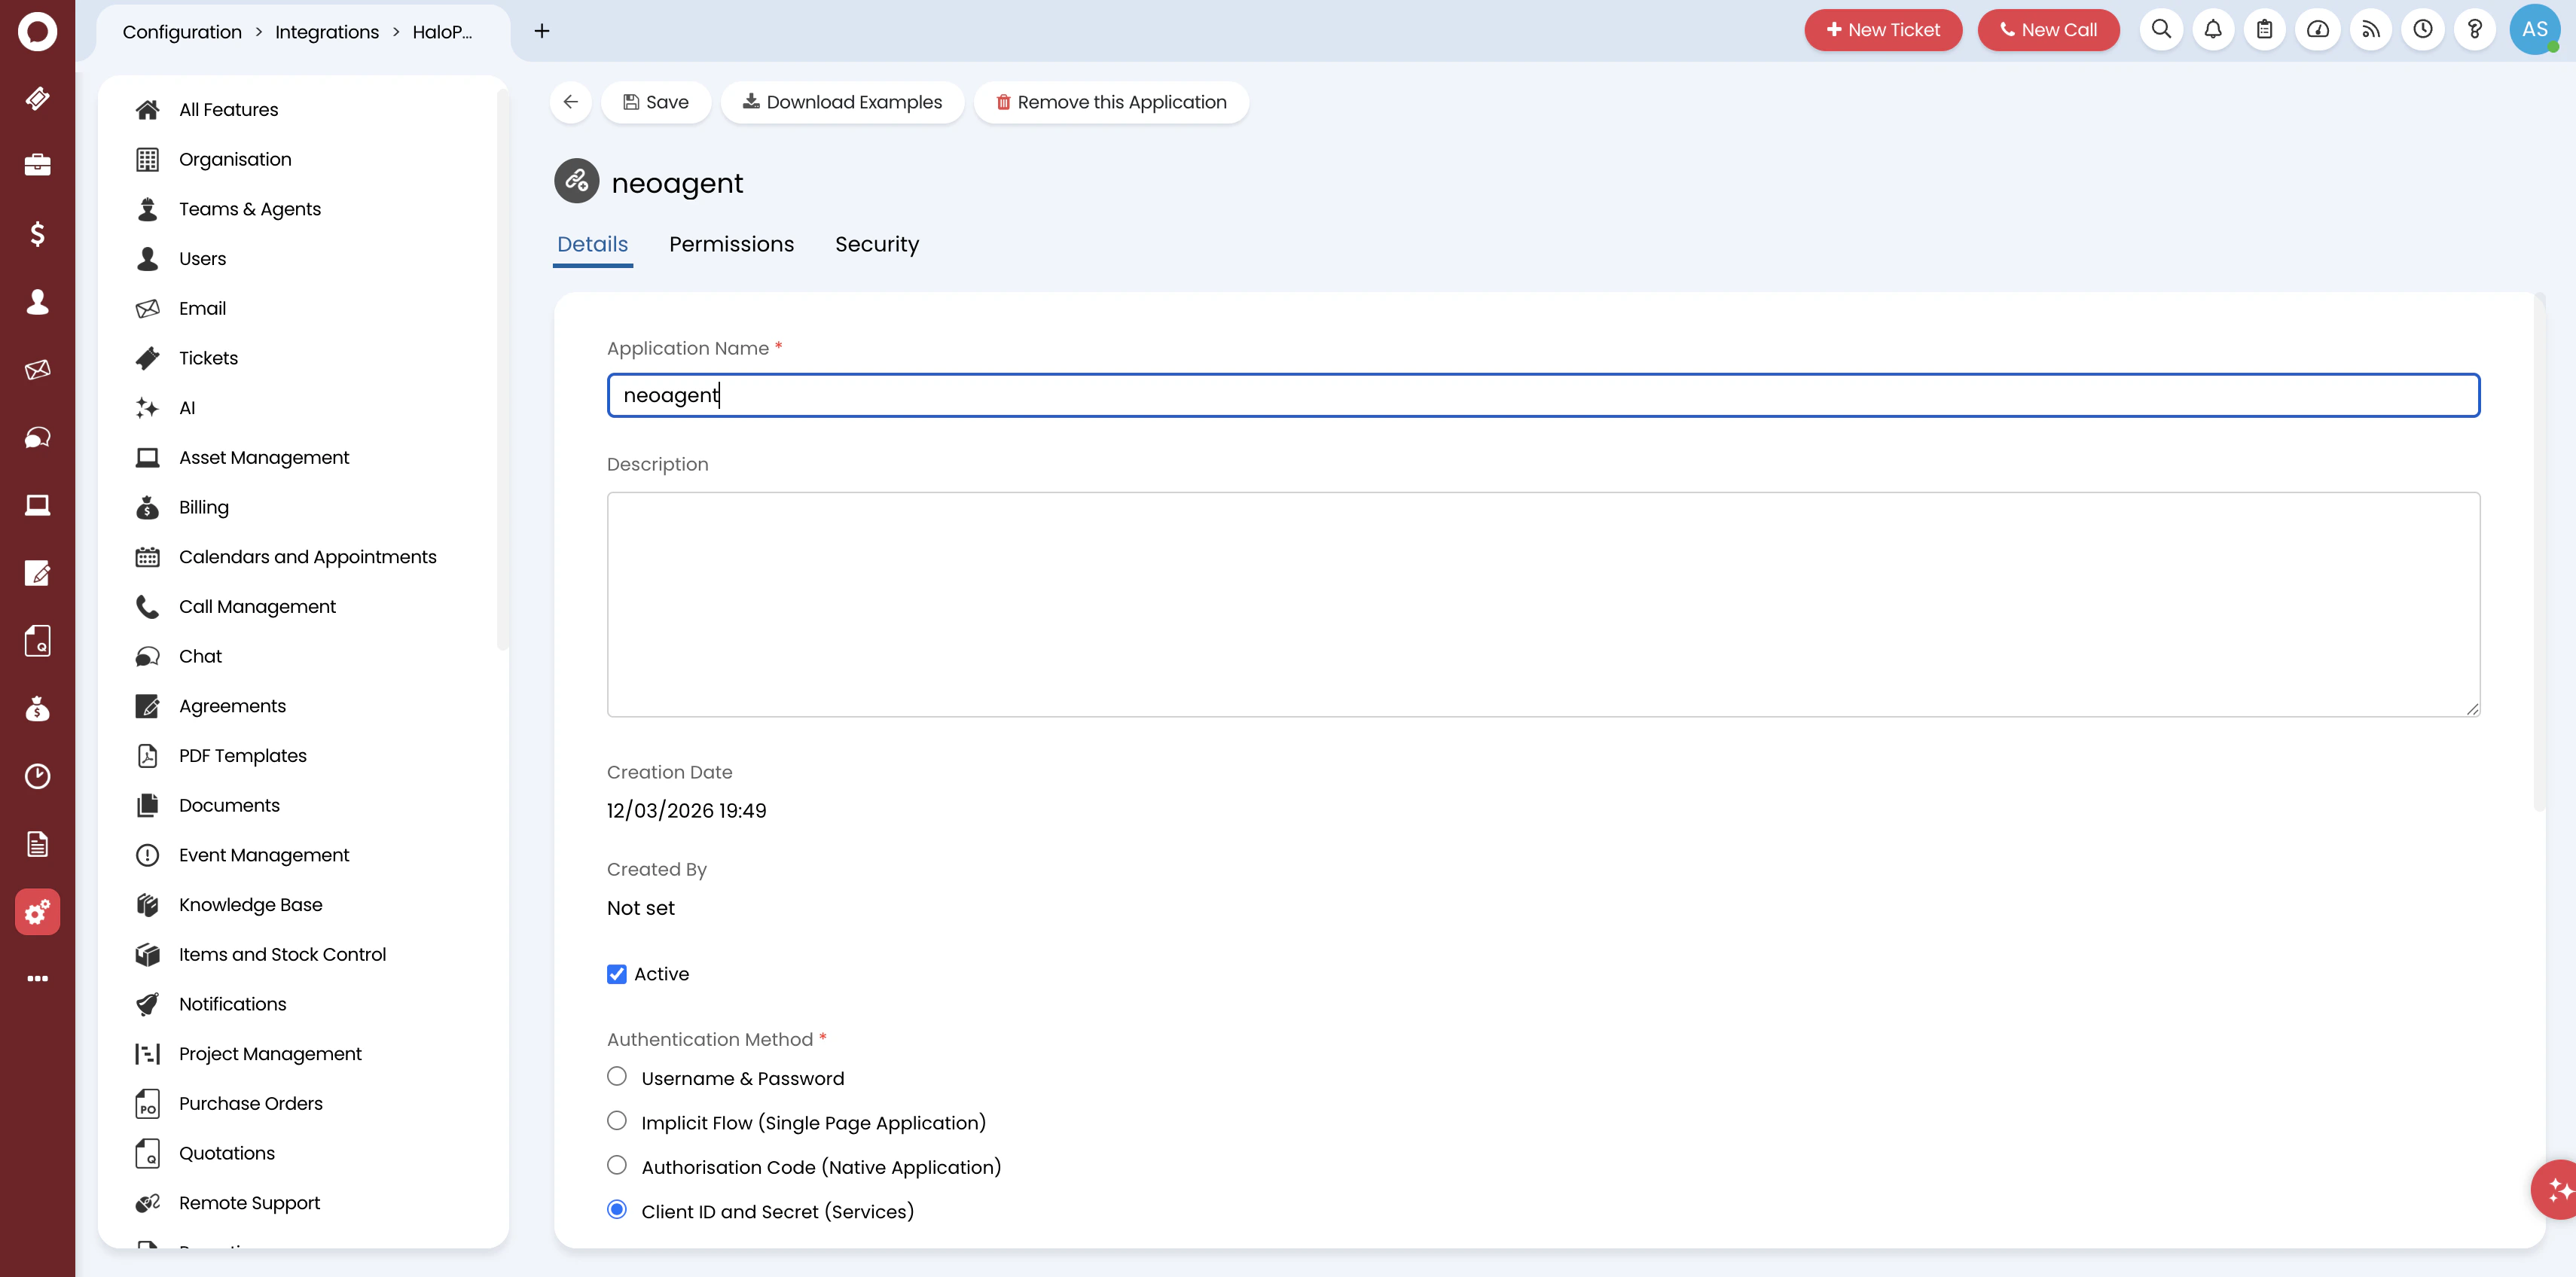 Configure the following fields:
* **Application Name**: Enter `neoagent` or a descriptive name like `Neo Agent Integration`
* **Active**: Ensure this is checked
* **Authentication Method**: Select **Client ID and Secret (Services)** for secure server-to-server API authentication
Make sure to select **Client ID and Secret (Services)** — not the other authentication methods. This is the only method suitable for server-to-server API integrations.
Click the **Permissions** tab. Set each of the following scopes to **Yes**, and leave every other scope (including **all** and **admin**) set to **No**:
* **all:standard** — read/write access to tickets, actions, contacts, assets, and the other standard areas Neo Agent works in.
* **all:teams** — access to your teams and agents so Neo Agent can route and assign tickets correctly.
* **admin:webhooks** — lets Neo Agent register its webhook automatically. **The connection fails without this scope** — see the warning below.
Configure the following fields:
* **Application Name**: Enter `neoagent` or a descriptive name like `Neo Agent Integration`
* **Active**: Ensure this is checked
* **Authentication Method**: Select **Client ID and Secret (Services)** for secure server-to-server API authentication
Make sure to select **Client ID and Secret (Services)** — not the other authentication methods. This is the only method suitable for server-to-server API integrations.
Click the **Permissions** tab. Set each of the following scopes to **Yes**, and leave every other scope (including **all** and **admin**) set to **No**:
* **all:standard** — read/write access to tickets, actions, contacts, assets, and the other standard areas Neo Agent works in.
* **all:teams** — access to your teams and agents so Neo Agent can route and assign tickets correctly.
* **admin:webhooks** — lets Neo Agent register its webhook automatically. **The connection fails without this scope** — see the warning below.
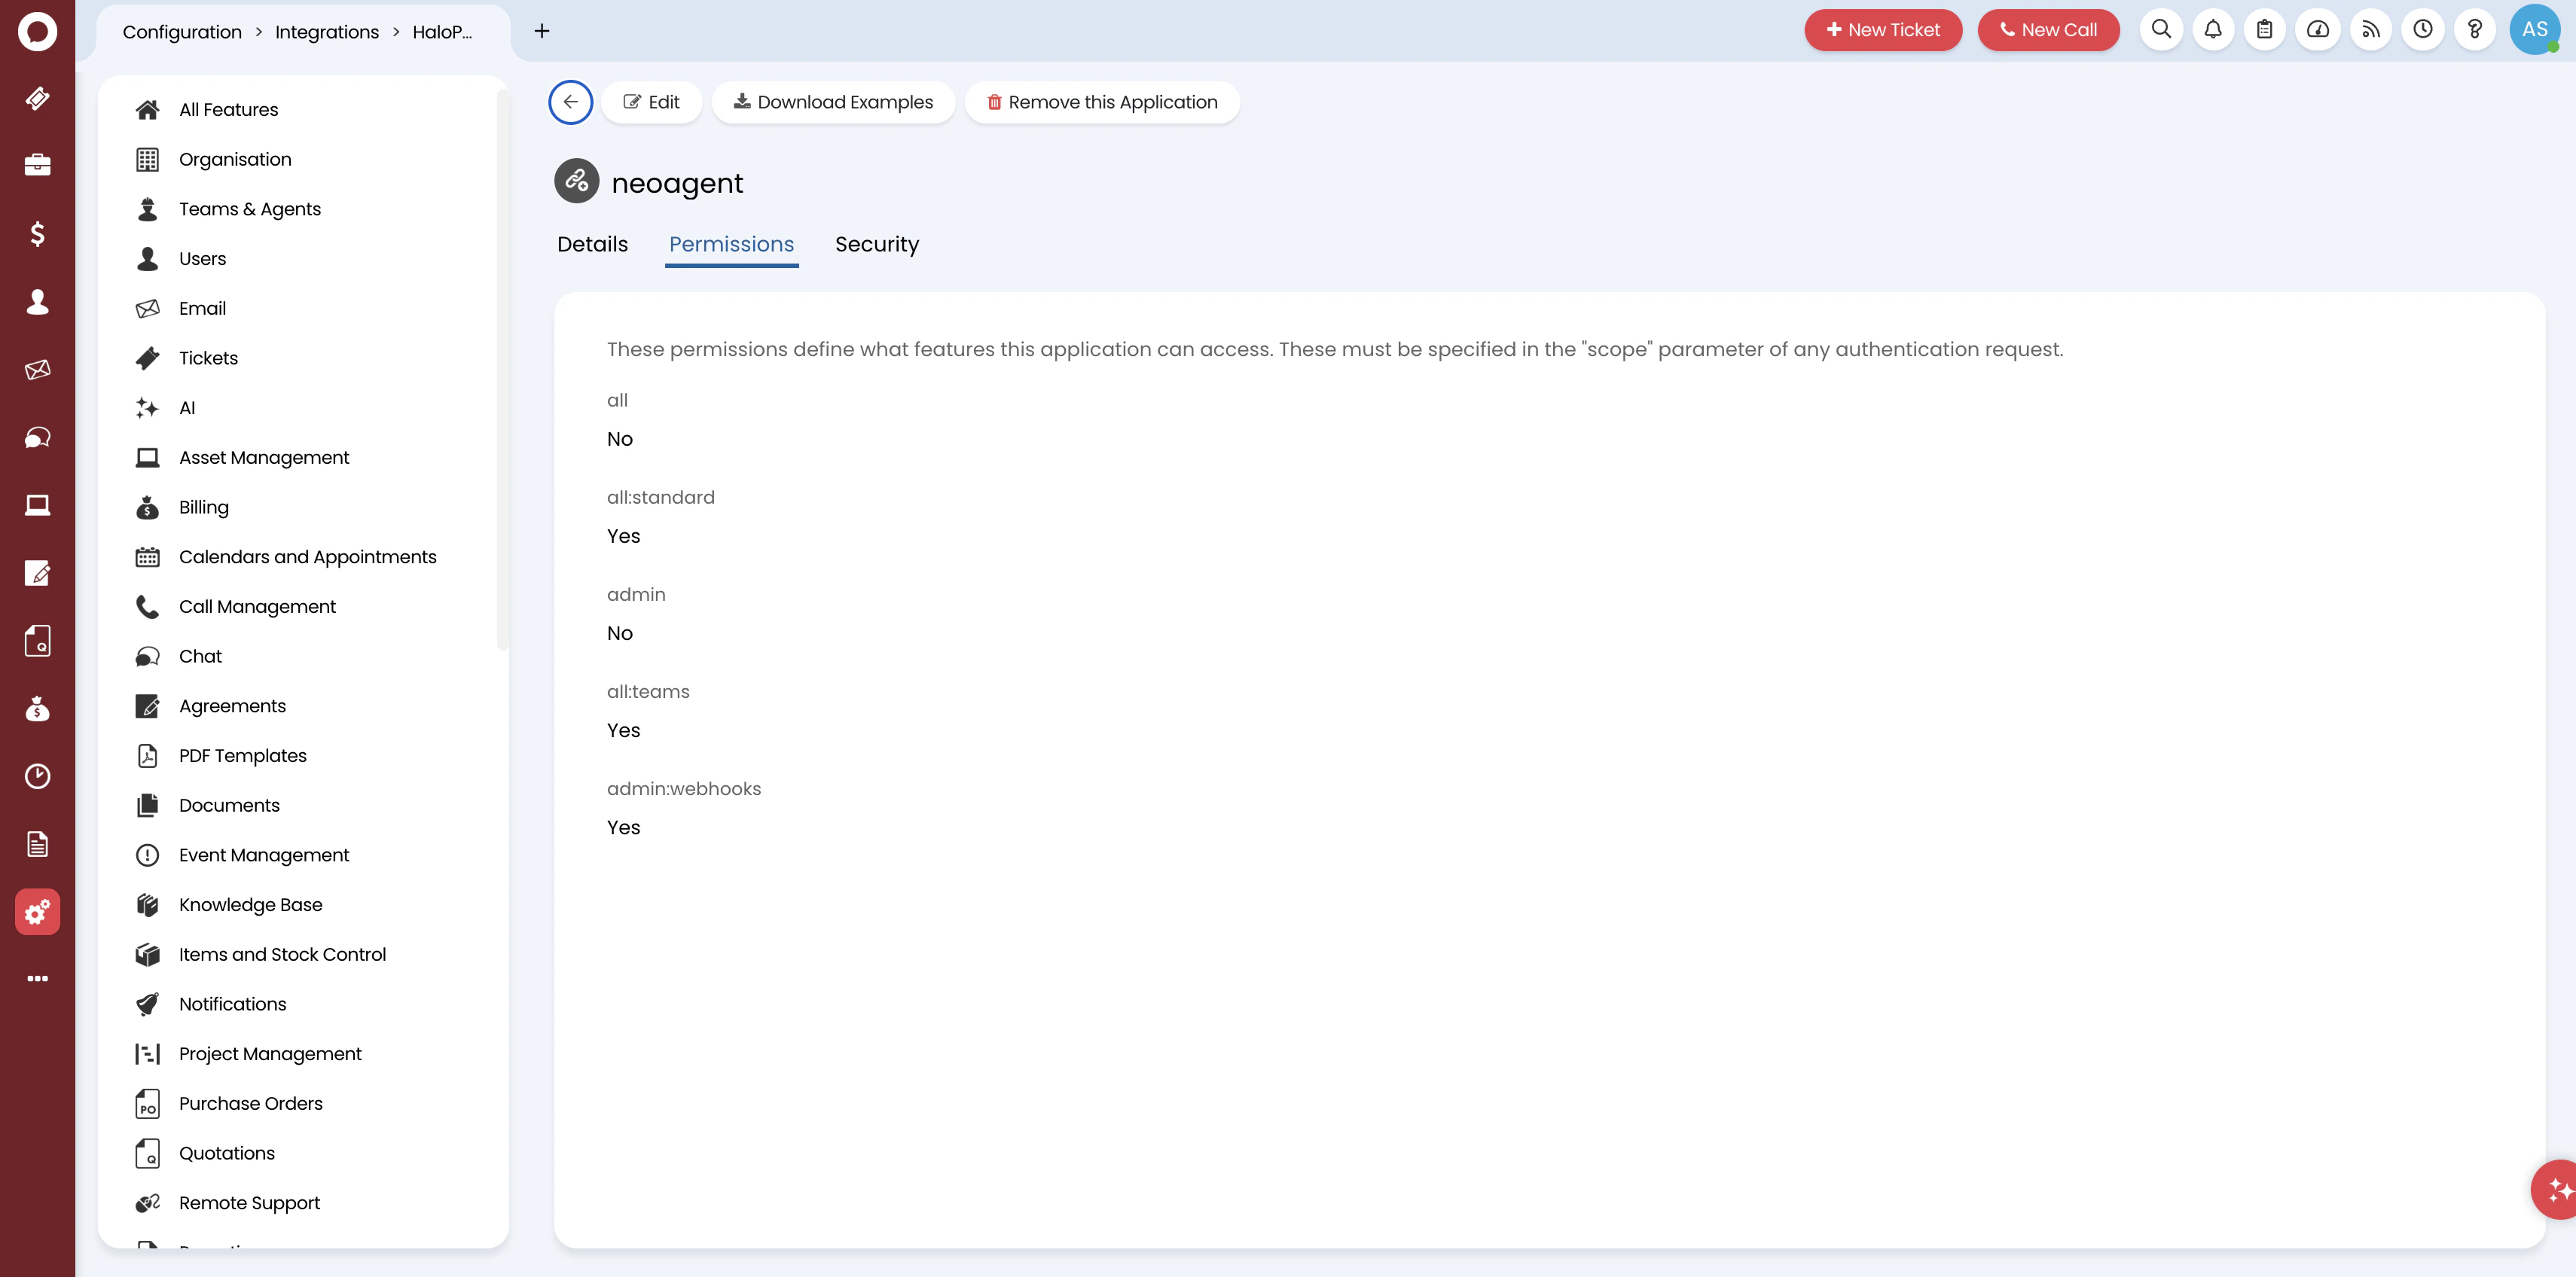 **You must enable `admin:webhooks`.** HaloPSA's `all` and `all:standard` scopes do **not** cover webhook administration. When you connect to Neo Agent, it automatically creates the **Neo Tickets callback \[ALL]** webhook — and that request returns **401 Unauthorized** if `admin:webhooks` is missing, so the connection cannot complete. This is the most common reason a HaloPSA connection fails *after* the Client ID and Secret are accepted.
HaloPSA uses coarse OAuth scopes — `all:standard` grants broad access because there is no way to grant read access to some areas and write access to others at the API level. Fine-grained control happens in the **Neo Agent dashboard**, where you configure exactly which areas Neo can read, write, or ignore.
### What Neo Agent accesses
Neo Agent **writes to**: tickets, actions (notes/time entries), contacts, assets, products, and appointments.
Neo Agent **reads only**: companies, SLAs, knowledge base, contracts, invoices, quotations, suppliers, opportunities, reports, and system configuration.
**Sensitive areas — safe at the dashboard layer.** Even though the API scopes grant broad access, Neo Agent's dashboard permission groups control exactly what Neo can do. The following areas default to read-only in Neo's standard permission profiles — Neo Agent never writes to them unless you explicitly enable it:
* **Invoices**: Invoice creation, recurring invoices, expenses, purchase orders, sales orders
* **Contracts**: Contract schedules, contract rules, prepay records
* **Suppliers**: Supplier records and supplier contracts
* **Opportunities**: Sales pipeline / CRM records
* **Configuration**: System metadata (statuses, priorities, categories, teams, agents, workflows)
* **SLAs**: Service level agreement definitions
You can enable write access to these areas later in the Neo Agent dashboard if needed.
Click **Save**. After saving, you'll see the application's authentication credentials:
**You must enable `admin:webhooks`.** HaloPSA's `all` and `all:standard` scopes do **not** cover webhook administration. When you connect to Neo Agent, it automatically creates the **Neo Tickets callback \[ALL]** webhook — and that request returns **401 Unauthorized** if `admin:webhooks` is missing, so the connection cannot complete. This is the most common reason a HaloPSA connection fails *after* the Client ID and Secret are accepted.
HaloPSA uses coarse OAuth scopes — `all:standard` grants broad access because there is no way to grant read access to some areas and write access to others at the API level. Fine-grained control happens in the **Neo Agent dashboard**, where you configure exactly which areas Neo can read, write, or ignore.
### What Neo Agent accesses
Neo Agent **writes to**: tickets, actions (notes/time entries), contacts, assets, products, and appointments.
Neo Agent **reads only**: companies, SLAs, knowledge base, contracts, invoices, quotations, suppliers, opportunities, reports, and system configuration.
**Sensitive areas — safe at the dashboard layer.** Even though the API scopes grant broad access, Neo Agent's dashboard permission groups control exactly what Neo can do. The following areas default to read-only in Neo's standard permission profiles — Neo Agent never writes to them unless you explicitly enable it:
* **Invoices**: Invoice creation, recurring invoices, expenses, purchase orders, sales orders
* **Contracts**: Contract schedules, contract rules, prepay records
* **Suppliers**: Supplier records and supplier contracts
* **Opportunities**: Sales pipeline / CRM records
* **Configuration**: System metadata (statuses, priorities, categories, teams, agents, workflows)
* **SLAs**: Service level agreement definitions
You can enable write access to these areas later in the Neo Agent dashboard if needed.
Click **Save**. After saving, you'll see the application's authentication credentials:
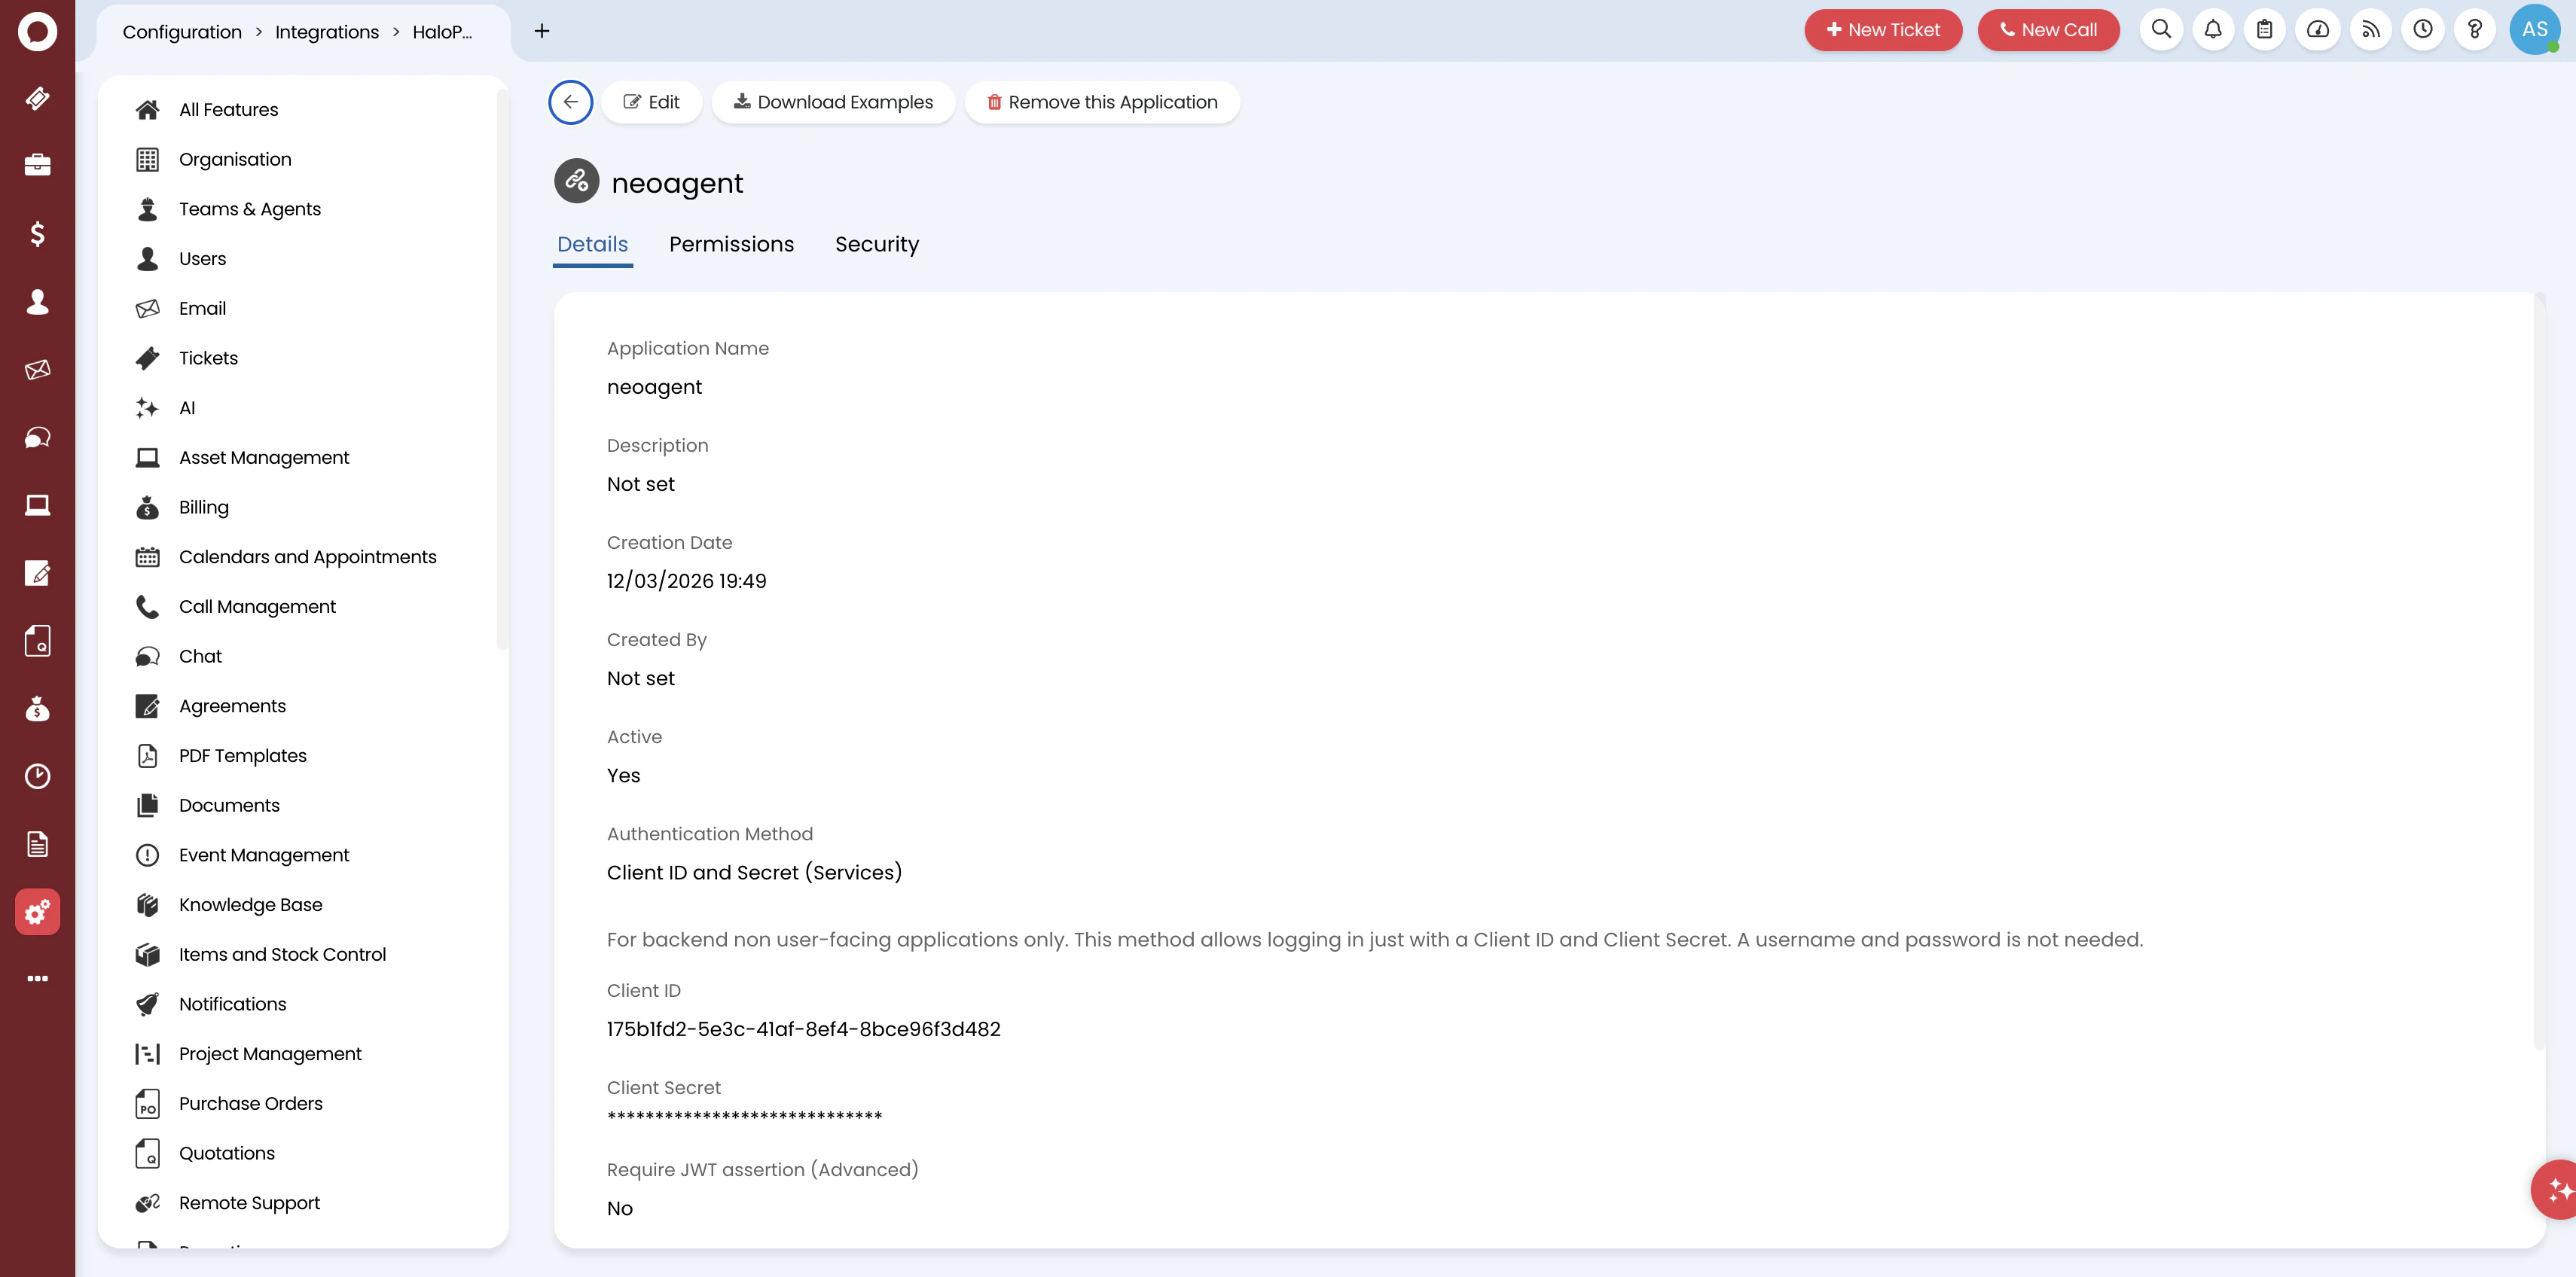 * **Client ID**: A unique identifier for your application
* **Client Secret**: A secure secret key for authentication (shown as dots — copy it when first generated)
Save these credentials immediately! The Client Secret may only be visible once during creation. You'll need both the Client ID and Client Secret to configure the connection to Neo Agent.
Make note of the following information for the Neo Agent integration setup:
* Client ID
* Client Secret
* Your HaloPSA base URL (e.g., `https://yourdomain.halopsa.com`)
* The Agent ID from the [previous step](/integrations/psa/halopsa/creating-agent)
## What's Next?
Once you've created the API application, you're ready to [connect HaloPSA to Neo Agent](/integrations/psa/halopsa/connecting-to-neo) using:
* The Client ID from your API application
* The Client Secret from your API application
* Your HaloPSA base URL
* The Agent ID for impersonation
Before proceeding, verify:
* Application name is set and status is **Active**
* Authentication method is **Client ID and Secret (Services)**
* Permissions: **all:standard**, **all:teams**, and **admin:webhooks** scopes are all set to **Yes**
* Client ID and Client Secret are saved securely
* **Client ID**: A unique identifier for your application
* **Client Secret**: A secure secret key for authentication (shown as dots — copy it when first generated)
Save these credentials immediately! The Client Secret may only be visible once during creation. You'll need both the Client ID and Client Secret to configure the connection to Neo Agent.
Make note of the following information for the Neo Agent integration setup:
* Client ID
* Client Secret
* Your HaloPSA base URL (e.g., `https://yourdomain.halopsa.com`)
* The Agent ID from the [previous step](/integrations/psa/halopsa/creating-agent)
## What's Next?
Once you've created the API application, you're ready to [connect HaloPSA to Neo Agent](/integrations/psa/halopsa/connecting-to-neo) using:
* The Client ID from your API application
* The Client Secret from your API application
* Your HaloPSA base URL
* The Agent ID for impersonation
Before proceeding, verify:
* Application name is set and status is **Active**
* Authentication method is **Client ID and Secret (Services)**
* Permissions: **all:standard**, **all:teams**, and **admin:webhooks** scopes are all set to **Yes**
* Client ID and Client Secret are saved securely