> ## Documentation Index
> Fetch the complete documentation index at: https://docs.neoagent.io/llms.txt
> Use this file to discover all available pages before exploring further.
# Marketplaces
> Manage SaaS licensing and automate provisioning checks
## Supported platforms
* Pax8
* D\&H Cloud Marketplace
* Ingram Micro Cloud Marketplace
* Sherweb
* Microsoft Partner Center
## What you can automate
* Purchase or cancel license seats, targeting a **specific subscription** when multiple exist for the same license
* Assign or unassign licenses as part of user lifecycle
* Adjust license seats during onboarding/offboarding
* Sync product and subscription data to drive checks
## Subscription targeting
Many MSPs maintain multiple subscriptions for the same Microsoft license (e.g., an 80/20 yearly/monthly split). Neo Agent targets the exact subscription by first calling [List License Subscriptions](/agents/tools/m365/list-license-subscriptions) to discover all subscriptions for a license — including their IDs, billing terms, commitment terms, and seat counts — and then passing the chosen subscription ID to the purchase or cancel tool.
Use custom instructions to guide which subscription the agent should target (e.g., "always add seats to the Monthly subscription").
## Setup overview
Marketplace integration requires two steps:
1. **Connect your platform** (once per MSP) — Save your API credentials under **Integrations → Other**. This lets Neo communicate with the marketplace API.
2. **Map each company** (per end-client) — On the **Companies** page, add a **Marketplace Company ID** for each company that needs license management. This tells Neo which marketplace customer corresponds to which PSA company.
The **Marketplace Company ID** is the customer identifier from your marketplace provider (e.g., the Ingram Micro `customerId`, Pax8 company UUID, D\&H account ID, or Sherweb customer ID) — **not** the Autotask or ConnectWise company ID. Find it in your marketplace portal under the customer's account details. For **Sherweb**, pick the customer from the dropdown instead (see [Sherweb](#sherweb)).
Without the per-company marketplace ID, Neo won't know which marketplace customer to query when managing licenses for that company.
## Step 1 — Connect your platform
### Pax8
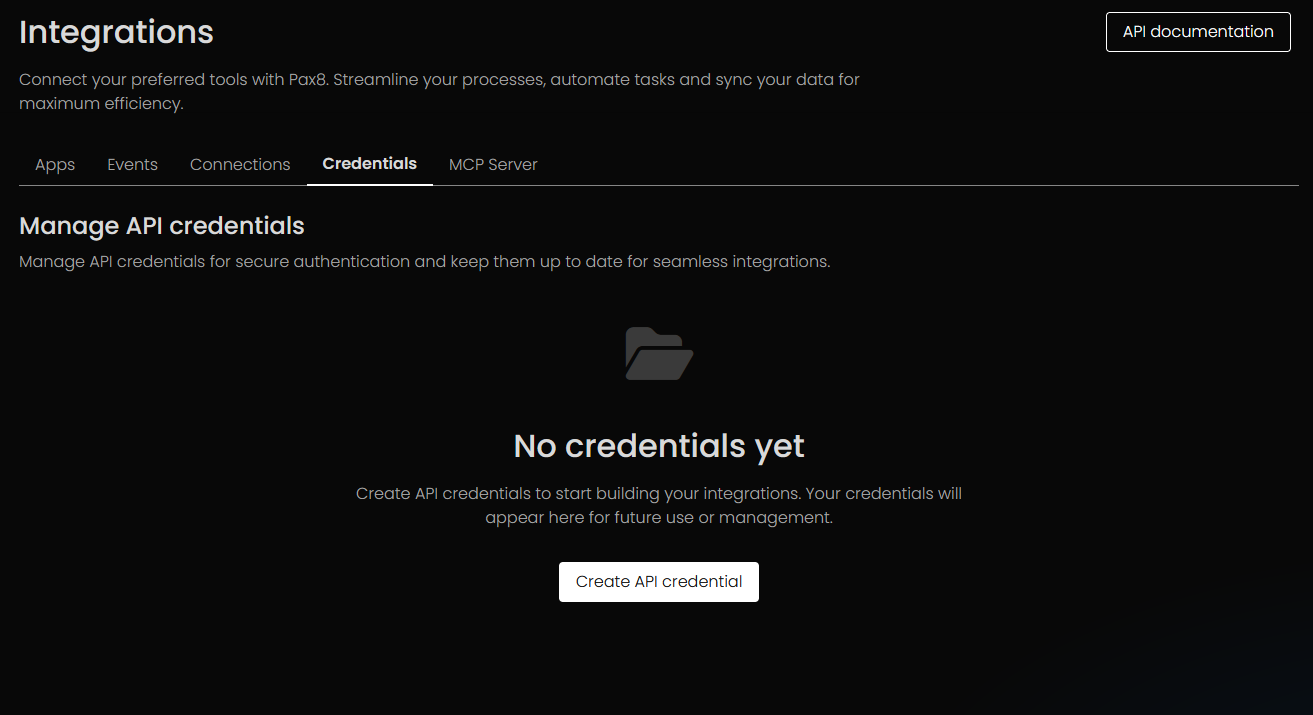
1. Open Pax8 Integrations → Credentials and create API credentials.
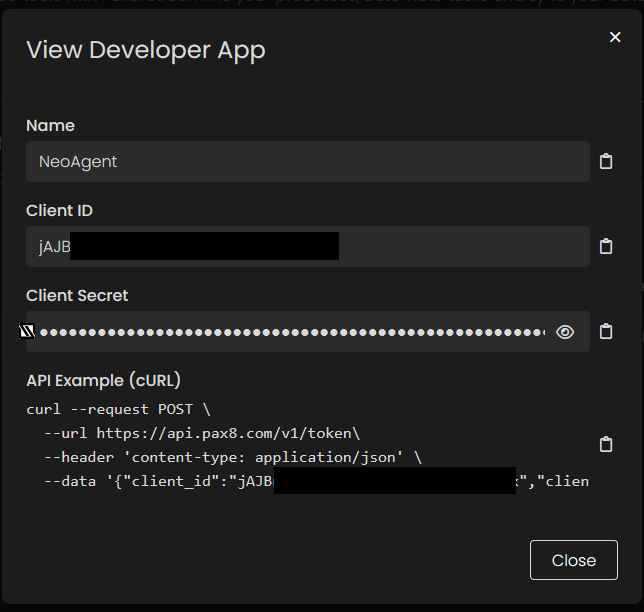
 2. View the credential to copy Client ID and Client Secret.
 3. In Neo, go to Integrations → Other and save the credentials.
### D\&H
1. Create a D\&H user with required access.
2. Find your AccountID from the MSP company URL, for example: `https://cp.dandhcloudsolutions.com/#/Account/View/54632/Overview`.
3. In Neo, save username, password, and AccountID under Integrations → Other.
### Ingram Micro Cloud Marketplace
Neo connects to the [Ingram Micro Cloud Marketplace API](https://apidocs.cloud.im/) to manage subscriptions and license seats. You will need five pieces of information:
| Credential | Description |
| -------------------- | --------------------------------------------------------------------------------------------------------------------------------------------------------------------------------------------------------------- |
| **Username** | Your Marketplace API username (typically in the format `youremail.API`) |
| **Password** | The password configured for the API user |
| **Subscription Key** | The `X-Subscription-Key` value that authenticates every API request |
| **API URL** | The API URL shown on your Marketplace API page — copy it **exactly** (e.g. `https://api.cloud.im/marketplace/na`). CloudBlue hosts differ by region/cluster, so this must come from your portal, not be guessed |
| **Marketplace** | Your country marketplace code (e.g. `au`, `nz`, `us`, `uk`) — one API URL can serve multiple marketplaces (the Oceania URL serves both `au` and `nz`) |
**Do not enter your regular XVantage login credentials into Neo — they will not work.** The Marketplace API is a separate product with its own dedicated username, password, and subscription key. You obtain these only after activating the free "Marketplace API" add-on (see Step 1). Attempting to authenticate with XVantage portal credentials will return `401 Unauthorized` from Ingram and no license operations will succeed.
Ingram Micro has consolidated its partner experience under **XVantage**, which is where you now manage cloud subscriptions and activate the Marketplace API add-on. For background on the underlying API, see Ingram's [Cloud Marketplace API — Getting Started](https://apidocs.cloud.im/1.5/howto/ready/) guide.
#### Step 1 — Activate the Marketplace API product (free)
1. Sign in to **XVantage** (or your regional Cloud Marketplace portal, e.g. `https://portal.cloud.im/`).
2. Search the storefront for **"Marketplace API"** — it lives under the *Integration and Tools* category.
3. Add it to your cart and place the order. **This is free (\$0.00)** — no charge is added to your account, but placing the order is what activates the API.
4. Once activated, a new **Marketplace API** menu item appears in your portal.
If you can't find the product, Ingram has a walkthrough on the [Cloud Marketplace API — Getting Started](https://apidocs.cloud.im/1.5/howto/ready/) page, and the [Ingram Developer Portal](https://developer.ingrammicro.com/) hosts the full API reference.
#### Step 2 — Collect your API credentials
1. Open the **Marketplace API** menu in XVantage (or the Cloud Marketplace portal).
2. Copy the **Username**, **API URL**, and **Subscription Key** shown on that page.
3. If you don't have a password yet or need a reset, contact Ingram Micro Cloud support:
* US: `imcloudservicedesk.us@cloud.im`
* General integration support: `usxvantageintegrations@ingrammicro.com`
#### Step 3 — Determine your marketplace code
The **API URL** from Step 2 already points Neo at the right regional host (for example, North America is served by `…/marketplace/na`, Europe and the UK by `…/marketplace/eu`, and Oceania by `…/marketplace/oc`) — so you don't enter a region separately.
You still need your **marketplace** code: the specific country marketplace Ingram tags each request with. One API URL can serve multiple marketplaces, so the host and the marketplace code are not the same value:
| Host region | Example marketplace codes |
| ---------------------------------- | -------------------------------------------------- |
| North America (`…/marketplace/na`) | `us` |
| Europe / UK (`…/marketplace/eu`) | `uk`, `de`, `fr`, `it`, `es`, … (country-specific) |
| Oceania (`…/marketplace/oc`) | `au`, `nz` |
If you skip the marketplace value, the token request fails with `401 Unauthorized` from Ingram — this is what Ingram means when they ask whether you're tagging requests with the correct country code.
#### Step 4 — Save credentials in Neo
1. In Neo, go to **Integrations → Other**.
2. Select **Ingram Micro** from the integration dropdown.
3. Enter your **username**, **password**, **subscription key**, **API URL**, and **marketplace**.
4. Click **Save**. Neo runs a live token call to confirm the credentials before saving, so a wrong API URL or marketplace code is caught here rather than failing silently later.
#### Finding your customer IDs
After connecting your credentials, you'll need each end-client's **Customer ID** to map them on the Companies page (see [Step 2](#step-2-—-map-companies-to-marketplace-customers)):
1. Sign in to XVantage (or your regional Cloud Marketplace portal).
2. Navigate to **Customers** and open the customer account.
3. The **Customer ID** is displayed in the customer details — this is the value to enter as the Marketplace Company ID in Neo.
Neo's integration uses Ingram's **Cloud Marketplace API** (the API URL you provide, e.g. `https://api.cloud.im/marketplace/na`), which covers SaaS subscription lifecycle — purchase, change quantity, cancel. Ingram's separate [XVantage Integration (XI) API](https://developer.ingrammicro.com/) covers product catalog, orders, quotes, invoices, and renewals for hardware/traditional SKUs, and is not currently used by Neo for M365 license management.
### Sherweb
Neo connects to the [Sherweb Service Provider API](https://developers.sherweb.com/) to manage subscriptions and license seats. You will need three pieces of information:
| Credential | Description |
| -------------------- | -------------------------------------------------------------------------- |
| **Client ID** | Your Sherweb API client ID |
| **Client Secret** | Your Sherweb API client secret |
| **Subscription Key** | The `Ocp-Apim-Subscription-Key` value that authenticates every API request |
#### Collecting your API credentials
1. Sign in to the [Sherweb Cumulus portal](https://cumulus.sherweb.com/).
2. Navigate to **Security → APIs**.
3. Create or view your API credentials to obtain the **Client ID**, **Client Secret**, and **Subscription Key**.
#### Saving credentials in Neo
1. In Neo, go to **Integrations → Other**.
2. Select **Sherweb** from the integration dropdown.
3. Enter your **Client ID**, **Client Secret**, and **Subscription Key**.
4. Click **Save**.
#### Mapping companies to Sherweb customers
1. Go to the **Companies** page and open (or add) a company.
2. Under **Marketplace Company IDs**, add a row and select **Sherweb**.
3. Pick the customer from the searchable dropdown and click **Save**.
### Microsoft Partner Center
1. Sign in to [Partner Center](https://partner.microsoft.com/dashboard/home) with a Global Admin account.
2. Select **Settings** (gear icon) → **Account settings** → **App management**.
* Direct link: [https://partner.microsoft.com/dashboard/v2/account-settings/appmanagement](https://partner.microsoft.com/dashboard/v2/account-settings/appmanagement)
* If you don't see this option, try with a different Global Admin user.
3. Add a new web app.
4. Copy the **App ID** and **Key** (client secret).
5. In Neo, go to **Integrations → Other**, select **Microsoft Partner Center**, and save the credentials.
## Step 2 — Map companies to marketplace customers
Once your platform credentials are saved, link each end-client company to its marketplace customer:
1. Go to the **Companies** page in Neo.
2. Click a company to open it.
3. Under **Marketplace Company IDs**, click **Add Marketplace**.
4. Select your marketplace provider (e.g., Ingram Micro) from the dropdown.
5. Enter the **customer ID from your marketplace portal** — this is the ID your marketplace provider uses to identify this customer, not the PSA company ID. For **Sherweb**, pick the customer from the dropdown instead (see [Sherweb](#sherweb)).
6. Click **Save**.
You can also set marketplace IDs in bulk via CSV import using the format `INGRAM_MICRO:customer-id` (or `PAX8:uuid`, `D_AND_H:id`, `SHERWEB:id`) in the `marketplace_ids` column.
Neo auto-detects which marketplace to use for each company based on the marketplace IDs you configure. If a company has multiple marketplace IDs, Neo checks in this order: Pax8 → D\&H → Ingram Micro → Sherweb → Microsoft Partner Center.
3. In Neo, go to Integrations → Other and save the credentials.
### D\&H
1. Create a D\&H user with required access.
2. Find your AccountID from the MSP company URL, for example: `https://cp.dandhcloudsolutions.com/#/Account/View/54632/Overview`.
3. In Neo, save username, password, and AccountID under Integrations → Other.
### Ingram Micro Cloud Marketplace
Neo connects to the [Ingram Micro Cloud Marketplace API](https://apidocs.cloud.im/) to manage subscriptions and license seats. You will need five pieces of information:
| Credential | Description |
| -------------------- | --------------------------------------------------------------------------------------------------------------------------------------------------------------------------------------------------------------- |
| **Username** | Your Marketplace API username (typically in the format `youremail.API`) |
| **Password** | The password configured for the API user |
| **Subscription Key** | The `X-Subscription-Key` value that authenticates every API request |
| **API URL** | The API URL shown on your Marketplace API page — copy it **exactly** (e.g. `https://api.cloud.im/marketplace/na`). CloudBlue hosts differ by region/cluster, so this must come from your portal, not be guessed |
| **Marketplace** | Your country marketplace code (e.g. `au`, `nz`, `us`, `uk`) — one API URL can serve multiple marketplaces (the Oceania URL serves both `au` and `nz`) |
**Do not enter your regular XVantage login credentials into Neo — they will not work.** The Marketplace API is a separate product with its own dedicated username, password, and subscription key. You obtain these only after activating the free "Marketplace API" add-on (see Step 1). Attempting to authenticate with XVantage portal credentials will return `401 Unauthorized` from Ingram and no license operations will succeed.
Ingram Micro has consolidated its partner experience under **XVantage**, which is where you now manage cloud subscriptions and activate the Marketplace API add-on. For background on the underlying API, see Ingram's [Cloud Marketplace API — Getting Started](https://apidocs.cloud.im/1.5/howto/ready/) guide.
#### Step 1 — Activate the Marketplace API product (free)
1. Sign in to **XVantage** (or your regional Cloud Marketplace portal, e.g. `https://portal.cloud.im/`).
2. Search the storefront for **"Marketplace API"** — it lives under the *Integration and Tools* category.
3. Add it to your cart and place the order. **This is free (\$0.00)** — no charge is added to your account, but placing the order is what activates the API.
4. Once activated, a new **Marketplace API** menu item appears in your portal.
If you can't find the product, Ingram has a walkthrough on the [Cloud Marketplace API — Getting Started](https://apidocs.cloud.im/1.5/howto/ready/) page, and the [Ingram Developer Portal](https://developer.ingrammicro.com/) hosts the full API reference.
#### Step 2 — Collect your API credentials
1. Open the **Marketplace API** menu in XVantage (or the Cloud Marketplace portal).
2. Copy the **Username**, **API URL**, and **Subscription Key** shown on that page.
3. If you don't have a password yet or need a reset, contact Ingram Micro Cloud support:
* US: `imcloudservicedesk.us@cloud.im`
* General integration support: `usxvantageintegrations@ingrammicro.com`
#### Step 3 — Determine your marketplace code
The **API URL** from Step 2 already points Neo at the right regional host (for example, North America is served by `…/marketplace/na`, Europe and the UK by `…/marketplace/eu`, and Oceania by `…/marketplace/oc`) — so you don't enter a region separately.
You still need your **marketplace** code: the specific country marketplace Ingram tags each request with. One API URL can serve multiple marketplaces, so the host and the marketplace code are not the same value:
| Host region | Example marketplace codes |
| ---------------------------------- | -------------------------------------------------- |
| North America (`…/marketplace/na`) | `us` |
| Europe / UK (`…/marketplace/eu`) | `uk`, `de`, `fr`, `it`, `es`, … (country-specific) |
| Oceania (`…/marketplace/oc`) | `au`, `nz` |
If you skip the marketplace value, the token request fails with `401 Unauthorized` from Ingram — this is what Ingram means when they ask whether you're tagging requests with the correct country code.
#### Step 4 — Save credentials in Neo
1. In Neo, go to **Integrations → Other**.
2. Select **Ingram Micro** from the integration dropdown.
3. Enter your **username**, **password**, **subscription key**, **API URL**, and **marketplace**.
4. Click **Save**. Neo runs a live token call to confirm the credentials before saving, so a wrong API URL or marketplace code is caught here rather than failing silently later.
#### Finding your customer IDs
After connecting your credentials, you'll need each end-client's **Customer ID** to map them on the Companies page (see [Step 2](#step-2-—-map-companies-to-marketplace-customers)):
1. Sign in to XVantage (or your regional Cloud Marketplace portal).
2. Navigate to **Customers** and open the customer account.
3. The **Customer ID** is displayed in the customer details — this is the value to enter as the Marketplace Company ID in Neo.
Neo's integration uses Ingram's **Cloud Marketplace API** (the API URL you provide, e.g. `https://api.cloud.im/marketplace/na`), which covers SaaS subscription lifecycle — purchase, change quantity, cancel. Ingram's separate [XVantage Integration (XI) API](https://developer.ingrammicro.com/) covers product catalog, orders, quotes, invoices, and renewals for hardware/traditional SKUs, and is not currently used by Neo for M365 license management.
### Sherweb
Neo connects to the [Sherweb Service Provider API](https://developers.sherweb.com/) to manage subscriptions and license seats. You will need three pieces of information:
| Credential | Description |
| -------------------- | -------------------------------------------------------------------------- |
| **Client ID** | Your Sherweb API client ID |
| **Client Secret** | Your Sherweb API client secret |
| **Subscription Key** | The `Ocp-Apim-Subscription-Key` value that authenticates every API request |
#### Collecting your API credentials
1. Sign in to the [Sherweb Cumulus portal](https://cumulus.sherweb.com/).
2. Navigate to **Security → APIs**.
3. Create or view your API credentials to obtain the **Client ID**, **Client Secret**, and **Subscription Key**.
#### Saving credentials in Neo
1. In Neo, go to **Integrations → Other**.
2. Select **Sherweb** from the integration dropdown.
3. Enter your **Client ID**, **Client Secret**, and **Subscription Key**.
4. Click **Save**.
#### Mapping companies to Sherweb customers
1. Go to the **Companies** page and open (or add) a company.
2. Under **Marketplace Company IDs**, add a row and select **Sherweb**.
3. Pick the customer from the searchable dropdown and click **Save**.
### Microsoft Partner Center
1. Sign in to [Partner Center](https://partner.microsoft.com/dashboard/home) with a Global Admin account.
2. Select **Settings** (gear icon) → **Account settings** → **App management**.
* Direct link: [https://partner.microsoft.com/dashboard/v2/account-settings/appmanagement](https://partner.microsoft.com/dashboard/v2/account-settings/appmanagement)
* If you don't see this option, try with a different Global Admin user.
3. Add a new web app.
4. Copy the **App ID** and **Key** (client secret).
5. In Neo, go to **Integrations → Other**, select **Microsoft Partner Center**, and save the credentials.
## Step 2 — Map companies to marketplace customers
Once your platform credentials are saved, link each end-client company to its marketplace customer:
1. Go to the **Companies** page in Neo.
2. Click a company to open it.
3. Under **Marketplace Company IDs**, click **Add Marketplace**.
4. Select your marketplace provider (e.g., Ingram Micro) from the dropdown.
5. Enter the **customer ID from your marketplace portal** — this is the ID your marketplace provider uses to identify this customer, not the PSA company ID. For **Sherweb**, pick the customer from the dropdown instead (see [Sherweb](#sherweb)).
6. Click **Save**.
You can also set marketplace IDs in bulk via CSV import using the format `INGRAM_MICRO:customer-id` (or `PAX8:uuid`, `D_AND_H:id`, `SHERWEB:id`) in the `marketplace_ids` column.
Neo auto-detects which marketplace to use for each company based on the marketplace IDs you configure. If a company has multiple marketplace IDs, Neo checks in this order: Pax8 → D\&H → Ingram Micro → Sherweb → Microsoft Partner Center.